
OSI/AS and OSI/TS Supplement (Includes RFC-1006 Support)


Configuring OSI/AS
RFC-1006 Subsystem Configuration
2–18 107751 Tandem Computers Incorporated
2. Use the ADD ENTRY #NSAP command to register the local NSAP entry (IP
address) with the OSI manager. This step also associates the SNPA entry
(from Step 1) with this NSAP entry and assigns a TSP process to handle all
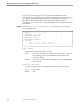
connections that use this NSAP entry. The command syntax is:
ADD [ ENTRY
entry-name
] ,
[ L4SERVER
indirect-process-name
] ,
[ NETADDR-MODE { NORMAL | X25-1980 } ]
[ SNPA
string
]
entry-name
specifies the NSAP, the local IP address.
indirect-process-name
defines the name of the TSP process that might
service connections for this SNPA. The L4SERVER attribute is used only for
local entry names.
When TCP/IP is the NSP, the NETADDR-MODE attribute for an #NSAP entry
must be NORMAL (the default value).
string
defines an internal number used to associate an NSP process with an
IP address (see previous note).
Example:
ADD ENTRY $OSIM.#NSAP.08000124, L4SERVER
$OSIMGR.#TSP.TCP0, SNPA 80
Use the ALTER ENTRY command to change the values of the L4SERVER and
SNPA attributes of an existing entry.
Verify the TSP process name and SNPA entry by using the INFO ENTRY
command with the DETAIL option.
3. Use the ADD ENTRY #NSAP command to register the remote NSAP (IP
address) with the OSI manager. You don't need to associate an SNPA to the
remote NSAP.
Example:
ADD ENTRY $OSIM.#NSAP.08000125
4. Use the ADD ENTRY #TSEL command to register the local and remote TSEL
with the OSI manager as you normally would.
5. Use the ADD ENTRY #APPL command to register the local and remote
application names with the OSI manager as you normally would.
Start the TAPS and TSP processes as you normally would.