
OSM Migration Guide (G06.28+)

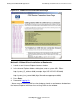
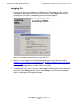

Table Of Contents
- What’s New in This Manual
- About This Guide
- 1 Introduction to OSM
- 2 Preparing for OSM
- 3 OSM Server-Based Components
- 4 OSM Client-Based Components
- 5 Getting Started With OSM Applications
- 6 TSM Coexistence and Fallback
- A Migrating Your Registry Settings
- B Memory Guidelines for OSM
- C Configuring Remote Services
- Configure Modem for Dial-In and Dial-Out
- Create Windows User Name
- Configure Carbon Copy 5.7 or Microsoft NetMeeting for Dial-In
- Configure OSM Notification Director (ND) for Each Host Server
- Configure OSM Notification Director (ND) for Dial-In and Dial-Out
- Configure Incoming Connections
- Reconfigure System Standby and Hibernate Mode
- D Troubleshooting
- E Uninstalling TSM
- Index

Getting Started With OSM Applications
OSM Migration Guide—527273-015
5-12
Functional Differences
The suggested (default) name includes the system name and the date and time that
the snapshot was created. The default location is ZSUPPORT>OSM>snapshots on
your PC’s local disk.
Loading Snapshots
Snapshot files can be transferred to and loaded on any workstation capable of
establishing an OSM Service Connection session. From the workstation containing the
snapshot file:
1. Start a new Internet Explorer browser session.
2. In the address bar, enter the URL of any valid OSM service connection (it does not
have to be the same system as the snapshot file you want to load), followed by
snapshot/index.html.
For example:
http://mysystem.lab.corp.net:9990/snapshot/index.html