
OSM Service Connection User's Guide (G06.30+)

systems through OSM (provided those systems are now running OSM server software).
The two bookmarks displayed per system represent the two IP addresses configured by
default for fault-tolerant service connections.
For details on migrating an existing TSM system list to a new system console (with or
without TSM installed), see the OSM Migration and Configuration Guide.
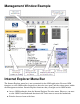
You can also create your own bookmarks for future use from within the OSM Service
Connection. Once you are logged on to a system, select Tools>Create Bookmark. If you
save the bookmark to the OSM Service Connection folder automatically created in your
IE Favorites directory, these bookmarks also appear on the OSM Service Connection
home page the next time you launch it.
●
Verifying the OSM Service Connection State
Select Connection Status from the Summary menu. The Connection Status dialog box
indicates the current state of all service connection processes. Each IP address listed is
associated with a TCP/IP stack configured in the OSMCONF (OSM server configuration) file.
OSM runs as a process pair for fault tolerance, which means the configuration file has two
stacks configured by default. You must have at least two connections with a status of UP for
your OSM Service Connection session to be fault tolerant.
Before bringing down either processor 0 or 1, it is important to know the state of your service
connection on the other processor, so you do not lose your OSM Service Connection session.
For more information on LAN connectivity options and configuring more TCPIP stacks in the
OSMCONF for additional fault tolerance, see the OSM Migration and Configuration Guide.
Running Multiple Sessions
You can run multiple sessions by:
Using either of the methods described in Launching an OSM Service Connection
You cannot run multiple sessions by:
Reusing a browser window used for a previous OSM Service Connection session●
Selecting File>New to open a new OSM session from within an existing session●
Prev Up Next
Chapter 3. Configuring OSM
Home
Chapter 5. Using the Management
Window
527274-021
Legal Notices