
OSM User's Guide (G06.27+)
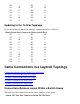
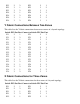
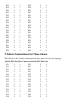
Table Of Contents
- OSM User's Guide
- OSM User's Guide
- What's New in This Guide
- About This Guide
- Related Reading
- Chapter 1. Introducing OSM
- Chapter 2. Preparing the OSM Environment
- Chapter 3. Configuring OSM
- Chapter 4. Starting the OSM Service Connection
- Chapter 5. Using the Management Window
- Chapter 6. Viewing Alarms
- Chapter 7. Viewing Attributes
- Chapter 8. Performing Actions
- Chapter 9. Viewing Summary Reports
- Chapter 10. Managing a System
- Chapter 11. System Resources
- Chapter 12. Managing a ServerNet Cluster
- Chapter 13. Cluster Resources
- Chapter 14. Updating ServerNet Cluster Topology
- Glossary
- Index
- Legal Notice
- Version and Copyright Information

to support node numbers 17 through 24. (The remaining star topology should
already use node numbers 1 through 8.)
Note: Changing the configuration tag requires a hard reset of the switches, resulting
in a temporary disruption of ServerNet connectivity. After the configuration
tags match on respective X and Y switches, the connectivity is repaired.
Perform the Update Topology action on each cluster. When prompted, click the Disable
Cluster Alarms button. No alarms related to connectivity (that would otherwise be dialed
out on multiple nodes) are dialed out for two hours unless you perform the Rediscover
action. Other types of alarms, such as hardware failures, are still dialed out.
8.
Disconnect any existing X-fabric cables between the cluster switches. (If you are
updating from a star topology, there are no existing cables between switches.)
9.
Connect all the cables between the X-fabric switches to support the new topology. The
new switch port connections will differ from the original cluster. See Cable Connections
Between Star Groups. For more information on connecting cables refer to the ServerNet
Cluster Manual.
10.
Use OSM to monitor the connectivity on the X fabric for all the nodes and switches.
Connectivity on the X fabric should be restored over time. Confirm that the original
nodes of the cluster are visible. If necessary, resolve any connectivity problems by
following the repair actions.
11.
Disconnect any existing Y-fabric cables between the cluster switches. (If you are
updating from a star topology, there are no existing cables between switches.)
12.
Connect all the cables between the Y-fabric switches to support the new topology. The
new switch port connections will differ from the original cluster. See Cable Connections
Between Star Groups. For more information on connecting cables, refer to the ServerNet
Cluster Manual.
13.
Use OSM to monitor the connectivity on the Y fabric for all the nodes and switches.
Connectivity on the Y fabric should be restored over time. Confirm that the nodes from
the original clusters are visible.
14.
If any nodes are not visible to the cluster, perform the Add Node to ServerNet Cluster
action on the nodes that are not visible to the cluster.
15.
If there are no connectivity problems, perform the Rediscover action on the ServerNet
Cluster resource. OSM is now configured to dial out alarms.
16.
If you need to add new nodes to the cluster, use the Add Node to ServerNet Cluster action. This
action launches a guided procedure with online help to assist you.
If you need to move any nodes within the cluster, see the information on moving a node in the
ServerNet Cluster Manual.