
OSM User's Guide (G06.27+)
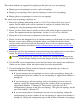
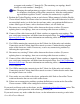
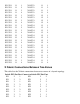
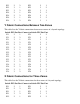
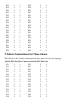
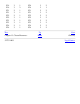
Table Of Contents
- OSM User's Guide
- OSM User's Guide
- What's New in This Guide
- About This Guide
- Related Reading
- Chapter 1. Introducing OSM
- Chapter 2. Preparing the OSM Environment
- Chapter 3. Configuring OSM
- Chapter 4. Starting the OSM Service Connection
- Chapter 5. Using the Management Window
- Chapter 6. Viewing Alarms
- Chapter 7. Viewing Attributes
- Chapter 8. Performing Actions
- Chapter 9. Viewing Summary Reports
- Chapter 10. Managing a System
- Chapter 11. System Resources
- Chapter 12. Managing a ServerNet Cluster
- Chapter 13. Cluster Resources
- Chapter 14. Updating ServerNet Cluster Topology
- Glossary
- Index
- Legal Notice
- Version and Copyright Information

X1 9 X2 9
X1 10 X2 10
X1 11 X2 11
Y1 8 Y2 8
Y1 9 Y2 9
Y1 10 Y2 10
Y1 11 Y2 11
Updating to the Tri-Star Topology
If you are updating to the tri-star topology, connect the cables as follows:
Cluster Switch Port Connects to Cluster Switch Port
X1 8 X2 10
X1 9 X2 11
X1 10 X3 8
X1 11 X3 9
X2 8 X3 10
X2 9 X3 11
Y1 8 Y2 10
Y1 9 Y2 11
Y1 10 Y3 8
Y1 11 Y3 9
Y2 8 Y3 10
Y2 9 Y3 11
Cable Connections in a Layered Topology
Connections Between Layers Within a Switch Group
X Fabric Connections Between Two Zones
Y Fabric Connections Between Two Zones
X Fabric Connections for Three Zones
Y Fabric Connections for Three Zones
Connections Between Layers Within a Switch Group
This table lists the connections between layers within a switch group:
Switch PIC Slot Port Connect to Switch PIC Slot Port