
OVNM 5.3 - Operations Agent for NonStop Console Guide

Some examples of valid search strings for collectors are:
*
$*
$AB*
$Z?OG* etc.
Tools and Web Links
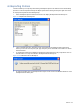
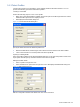
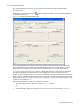
If using a Logfile based query, you can specify a maximum of one Logfile using the Logfile box. This
can either be provided directly or you have the option to search for the specific Logfile on the server.
A valid search string for a log file must start with a dollar sign followed by up to 7 more characters (for
the volume) then a period, then 8 more characters (for the subvolume), a period and up to 8 more
characters (for the file). The characters can contain ‘*’ and ‘?’.
Some examples of valid search strings for log files are:
$SYSTEM.ZZ*.ZEV1*
$D*.MYSUBVOL.LOGFILES*
$SYSTEM.SUBVOL.* etc.
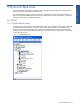
NOTE: A search string containing $*.*.* is not allowed since it will take a very long time to search the
whole system. Also, a search that contains wild cards in the volume or subvolume might take a long
time to return results.
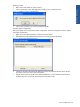
Clicking on the Search button would result in the retrieval of all the collectors/log files on the server.
The result is displayed in the Search Results box. Click on a collector/log file in the list and select it
using the >> button. You can use the << button to remove the collector/log file from the Selected
Collector(s)/Selected Logfile box.
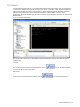
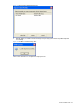
The next step is to select a filter file. This Filter File field is optional. You can leave it as blank if you do
not want to specify any filters for your query. If you want to specify one or more filters for your query
you can either enter them as comma separated values in the Filter File box or follow the same
procedure of search as done for the Logfiles/collectors. The valid search strings for filters are the same
as for the Logfiles. Click on the Search button to search for the filter file. The result is displayed in the
Search Results box. To select a filter file, click on the file from the list and then use the >> button. To
remove the filter file from the Selected Filter(s) list, select the file and then click on the << button.
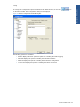
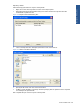
Specify the Start Date Time and Stop Date Time using the corresponding fields. Make sure the Start
Date Time must be less than the End Date Time. Use the Help button to access the online help. To
send the request with the selected settings, click on the Send Request button.
The results of the defined query will be displayed in the Event View pane.
Tools and Web Links 60