
OVNM 5.3 - Operations Agent for NonStop Installation Guide


OVNM Installation on Windows 24
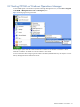
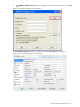
7. The Install Shield completes the installation on the workstation and the HP-OVNM Setup Completed screen is
displayed. Click the Finish button to complete the procedure.
Figure 2-14 HP-OVNM Setup Completed Screen
2-3-2 Upgrading OVNM Components on the HPOM Server
Refer to the section Upgrading OVNM on HPOM UNIX for details on how to upgrade OVNM on the HPOM
UNIX server.
2-3-3 Upgrading OVNM Agent on the HP NonStop Server
To upgrade OVNM Agent on the HP NonStop Server, perform the following steps.
1. Before upgrading the HP NonStop Server components, make sure that OVNM is not running on the
NonStop Node you are upgrading. You can use the following command.
FUP DUP <current OVNM subvol>.*, SAVEOVNM.*, sourcedate.
2. Start the OVNM Host Installation Client and select the node to be upgraded. Click the Upgrade/Upgrade
Release button to start the process. You will have to logon using the HP NonStop Server User ID and
password used for this installation. For an upgrade from pre-5.x to 5.x, the Configuration Name will default
to <node-name>-<vol.subvolume>.
3. Once the installation is complete, start OVNM on the HP NonStop Server.
4. Now, start the OVNM agents on the Management Server. Click Start Programs HP OVNM
Management Server Tools Start Agents option to start the OVNM agents.
The Connection established message displayed in the HPOM Message Browser.
Installing OVNM on
Windows