
OVNM 5.3 - Operations Agent for NonStop Installation Guide

Installing OVNM on HP NonStop Server 43
Installing OVNM on HP NonStop Server 43
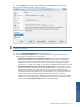
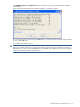
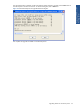
27. Once you have completed all the configurations, click the Install button in the New OVNM Configuration
dialog box to start installing OVNM on the HP NonStop host.
Figure 3-15 New OVNM Configuration Dialog Box
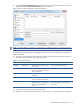
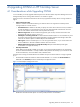
At this point you can perform any of the following tasks also.
a. To revert to the default field values, click the Reset Fields button.
b. Use the Cancel button to close the dialog box without saving the information.
c. Use the Add To Workstation button to add the configurations to the workstation. In this case, no
operation occurs on the HP NonStop Host. The Add To Workstation button can be used in case you
lose the configuration or deleted a node from the workstation without deleting it from the HP NonStop
Host. In that case, just add that configuration once again to the workstation.
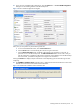
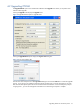
Clicking the Install button displays multiple confirmation screens depending upon the information given while
configuring.
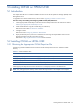
28. The OVNM Host Installation Client confirmation box is displayed if the Volume.Subvolume for some of the
filter files are not the same as the OVNM Volume.Subvolume.
Figure 3-16 OVNM Host Installation Client Confirmation Box
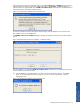
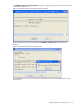
29. Click the OK button to continue with the same configuration.