HP Operations Agent for NonStop SNMP Adapter Guide Part number: 519585-002 Second edition: 01/2014
Legal notices Hewlett-Packard makes no warranty of any kind with regard to this manual, including, but not limited to, the implied warranties of merchantability and fitness for a particular purpose. Hewlett-Packard shall not be held liable for errors contained herein or direct, indirect, special, incidental or consequential damages in connection with the furnishing, performance, or use of this material.
Contents Preface Before You Begin ........................................................................................................................................ 4 Who Should Read This Guide ...................................................................................................................... 4 Goals of Documentation .............................................................................................................................. 4 Organization...........................
Preface Designed to meet the practical needs of the HP NonStop environment, this OVNM SNMP Adapter Guide explains the concepts behind SNMP Adapter and illustrates all the facets of the software. This Guide contains all the information necessary to understand SNMP Adapter and to use it effectively to solve your Enterprise management issues.
This section lists the main features of OVNM Adapter for SNMP and highlights the advantages this software offers. 1-1 What is SNMP Adapter? SNMP Adapter is a powerful tool facilitating policy-based management of HP NonStop environment at the enterprise level. It is a state-of-the-art agent, which integrates different SNMP compatible management platforms with HP NonStop systems to provide easy event manageability.
1-4 Benefits The following are the benefits of using SNMP Adapter: • Increased Service Availability: SNMP Adapter brings information critical to managing Service Level Agreements on HP NonStop systems to the Enterprise Management environment. System availability and performance will be improved, as monitoring will highlight potential breaches in Service Level Agreements.
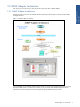
1-5 SNMP Adapter Architecture 1-5-1 SNMP Adapter Architecture The following figures show the consolidated data flow between the HP NonStop environment and the SNMP management server. Figure 1-1 SNMP Adapter Architecture The consolidated view provided by SNMP architecture helps in recognizing the SNMP traps that are sent and maps these SNMP events to increase the productivity of your operations staff.
1-5-2 SNMP Adapter Components SNMP Adapter Architecture can be grouped into the following categories: • Components on the HP NonStop Host • TCP/IP Communication Channel • Components on the Windows Workstation 1-5-2-1 Components on the HP NonStop Host • XXEMN: EMON Service SNMP Adapter provides open systems event monitoring of HP NonStop Servers.
2 Installing SNMP Adapter This chapter provides information on the steps to be followed for installing SNMP Adapter on Windows environment.
2-2 Installing SNMP Adapter on Windows This section covers the procedure to install SNMP Adapter on a Windows workstation. 1. Double-Click the SNMP-AdapterInstallation.exe to start the installation process. This will display SNMP Adapter Message Box. Figure 2-1 SNMP Adapter Message Box Make sure that the OVNM HP NonStop components are up and running. 2. Click the OK button to continue. Install Shield prepares the Setup program for use and the SNMP Adapter Welcome page is displayed.
3. Click the Next button. The License Agreement page is displayed. Installing SNMP Adapter Figure 2-3 SNMP Adapter License Agreement Page 4. Review the software license agreement and click the Yes button. The Choose Destination Location page is displayed with information about the location where SNMP will be installed on your computer.
5. To select a location other than the default location, click the Browse button. Else, click the Next button to continue. The Choose Destination Location page is displayed for selecting the path of the java.exe installed on your computer. Figure 2-5 SNMP Adapter Choose Destination Location Page – Java 6. To select a location other than the default location, click the Browse button. Else, click the Next button to continue. The Trap Generator Port Details page is displayed.
7. Enter the TrapGen Port number, and click the Next button. The Installation Information page is displayed. Figure 2-7 SNMP Adapter Installation Information Page 8. If you want to change any of the settings, that have been selected so far, click the Back button. Else, click the Next button to continue. The SNMP Trap Destination Information page is displayed.
9. Enter the SNMP trap destination IP Address and port number in the SNMP trap destination field, and click the Next button. The Elink Configuration page is displayed. Installing SNMP Adapter Figure 2-9 SNMP Adapter Elink Configuration Page 10. Enter the HP NonStop Configuration in the displayed fields. In the Configuration Name field enter the name for environment and in the Node field enter the node name where OVNM backend components are running. Click the Next button to continue.
11. Enter the HP NonStop Configuration in the IP Address and Port fields, and click the Next button to continue. The message box confirming need to add more HP NonStop nodes is displayed. 12. To add more nodes, click the Yes button. To continue without adding more nodes, click the No button. The Locked Files Information page is displayed with the information about the files that were locked during installation and have not been updated. These files will be updated after restarting the computer.
13. Click the Next button to continue. The Setup Completed page is displayed. Figure 2-13 SNMP Adapter Setup Completed Page 14. Click the Finish button to complete the Setup process. 15. Go to SNMP Adapter\TrapGenService\etc and modify the jetty-SNMP.xml, as per the parameters given in the Appendix C: Sample Jetty-SNMP.
2-3 Installing SNMP Adapter on UNIX This section covers the procedure to install SNMP Adapter on a UNIX workstation. 1. Start the installation process by executing the install script >./SNMP_install–install This starts the interactive phase of the installation process. 2. The system prompts you to enter the directory where SNMP-Adapter will be installed. The installation process will create additional sub-directories under the directory specified.
3 Displaying Events on NNM This chapter provides information on the steps to be followed for displaying the events on Network Node Management (NNM) on UNIX and Windows environment. 3-1 Displaying Events on Windows NNM The following files are required for displaying the Events on Windows NNM. • Load NonStop Traps.bat • NonStopTraps.conf • OVNMEvents_NNM.
Step C: Loading OVNMEvents_NNM.mib User can Load or unload OVNMEvents_NNM.mib file according to the requirements. To load the file Click the NNM window Options menu. Select the Load/Unload MIB’s:SNMP option from the displayed menu. This will load the OVNMEvents_NNM.mib file. Step D: Starting Adapter Services After uploading all the files, start the SNMP Adapter services from the Start/HP OVNM/SNMP Adapter/Start SNMP Adapter Agent option.
3-2 Displaying Events on NNM UNIX The following files are required for displaying the events on UNIX NNM. • NonStopTraps.conf • OVNMEvents_NNM.mib Follow the steps listed below to display HP NonStop events on NNM: Step A: Copy Files FTP the above files provided by HP and copy where NNM is installed under specified location (/opt/OV/bin). Step B: Loading Policies Execute the following command to load the policies of NonStop Events under Event Configuration window of NNM. cd /opt/OV/bin .
Step C: Loading OVNM Events. MIB User can Load or unload OVNMEvents_NNM.mib file according to the requirements. To load the file, Click the NNM Options menu. Select the Load/Unload MIB’s:SNMP option from the displayed menu. This displays the Load/Unload MIBs:SNMP / Load MIB from File window. Specify the location of OVNMEvents_NNM.mib file in Filter and MIB File to Load fields respectively. Figure 3-4 Load/Unload MIBs:SNMP / Load MIB from File Window Click the OK button to load the OVNMEvents_NNM.mib file.
Step D: Starting Adapter Services After uploading all the files, start the SNMP Adapter services using the following command from the directory where SNMP Adapter was installed. ./Start.sh This will start all the SNMP Adapter services and the events will be displayed on the NNM window. Displaying Events on NNM Figure 3-6 NNM NonStop Alarms Browser with HP NonStop Events Verifying Startup on the Workstation Execute the following script from the directory where SNMP-Adapter has been installed. ./Status.
Step B: Loading Policies Execute the following command to load the policies of NonStop Events under SNMP Trap Configurations / Trap Logging Configuration of NNMi cd /NNMiInstall/bin/ nnmincidentcfgload.ovpl -load NonStopTraps.tag Figure 3-7 Loading NonStop Traps All the policies are loaded in the NonStopTraps.tag file, as shown in the following figure. Figure 3-8 NNMi SNMP Trap Configuration Window with HP NonStop Event Policies Loaded Step C: Loading OVNMEvents_NNM.
Select the Load/Unload MIBs option from the displayed menu, as shown in the following figure. Figure 3-9 Load/Unload MIBs The MIBs Available to Load/Unload window is displayed. Click the Click link under the MIBs Available to Load (User Provided) section, as shown in the following figure.
The Upload Local MIB File window is displayed. Select OVNMEvents_SNMP.mib file located at /NNMiInstall/bin/using the Browse button, and click the Upload MIB button to upload it. Figure 3-11 Upload Local MIB File Window The Upload MIB File Data Result window is displayed. The window displays the location where the OVNMEvents_NNM.mib file is uploaded. Now you have to load this MIB file to NNMi. For this, click the load OVNMEvents_SNMP.mib link.
The SNMP Adapter services are started and NonStop SNMP events are displayed at the NNMi Incident Browsing SNMP Traps, as shown in the following figure. Figure 3-14 SNMP Traps 3-3-1-1 Displaying Events on Windows NNMi 9.x Using Command Prompt 1. Copy NonStopTraps.tag and OVNMEvents_SNMP.mib to the location where NNMi is installed 2. Upload NonStopTraps.tag /NNMiInstall/bin/nnmincidentcfgload.ovpl-load NonStopTraps.tag. 3.
4 Displaying Events on BMC Event Browser Follow the given steps to display the NonStop events on BMC Event Browser. Step A: Copy OVNMEvents_BMC.mib file FTP OVNMEvents_BMC.MIB file provided by HP to the following location. /usr/nc/Solutions/Connectsnmp/mibs Step B: Loading OVNMEvents_BMC.mib file and Mapping OIDs Run the following command on the specified location ./snmp2cef -f Example: ./snmp2cef -f OVNMEvents_BMC.mib Here is a sample output of the command: serverpem(NetCmmnd)63% .
When asked for a CEF Field, you may either enter the CEF Field number from the provided list or type the CEF Field name.
When asked for a CEF Field, you may either enter the CEF Field number from the provided list or type the CEF Field name.
Enter CEF Field name for Location (Enter for 'nomap') ====>11 When asked for a CEF Field, you may either enter the CEF Field number from the provided list or type the CEF Field name.
When asked for a CEF Field, you may either enter the CEF Field number from the provided list or type the CEF Field name.
Enter CEF Field name for SubSysNum (Enter for 'nomap') ====>2 When asked for a CEF Field, you may either enter the CEF Field number from the provided list or type the CEF Field name.
After loading OVNMEvents_BMC.mib file, restart SNMP Path to load the new configurations of the OVNMEvents_BMC.mib file using the following procedure. 1. Click the Admin menu in PATROL EM Console Launcher window. Figure 4-1 PATROL EM Console Launcher Window 2. Select Filter Path Management option. This displays the Filter Path Management window. Figure 4-2 Filter Path Management Window 3. Select SNMP from Active Filter Paths area and Click the Stop button.
5 Displaying Events on Netcool Follow the steps listed below to display HP NonStop events on Netcool 1. Open the mttrapd.rules file from the given location. /opt/netcool/omnibus/probes/solaris2 2. Insert the following entry in the mttrapd.rules file after the below mentioned line if (match ($generic-trap, "6")) { if (match($enterprise, ".1.3.6.1.4.1.11.779")) { @Summary = "Event Text: " + $19 + " Application: " + $4 + " Object: " + $5 + " Subject: " + $8 + " Subsystem No.: " + $13 + " Event No.
This will display the list of events on Netcool.
Appendix A: Installation Information 1. HP NonStop Node Name The Name of the HP NonStop Node where HP NonStop SST Agent is to be installed 2. Appendix A Example: \NODE Company Name The company in whose name SNMP-Adapter is registered. Example: ABC Inc.. 3. Destination Location The directory on the workstation where SNMP-Adapter installation files will be copied. 4. Trap Destination Information The SNMP Trap Destination ID where the traps will be displayed. Example: 111.111.111.111 5.
Appendix B: AdapterConf File Parameters The following table enlists and describes the various parameters of the Adapter.conf file. Table 3 Configuration Parameters of AdapterConf File Parameter Value Description TOOLID NONSTOP-TRAP Specifies the TOOLID. LOGFILE adapter.log Stores the trace messages to the specified log file. TRACE ON Sets the TRACE mode to ON | OFF. ALIVE 60 Checks whether elink is alive or not after every specified time interval. Default value is 180 seconds.
Parameter Description %a Abbreviated weekday name %A Full weekday name %b Abbreviated month name %B Full month name %c Date and time representation appropriate for locale %d Day of month as decimal number (01 – 31) %H Hour in 24-hour format (00 – 23) %I Hour in 12-hour format (01 – 12) %j Day of year as decimal number (001 – 366) %m Month as decimal number (01 – 12) %M Minute as decimal number (00 – 59) %p Current locale’s A.M./P.M.
Appendix C: Sample jetty-SNMP.xml File