
OVNM 5.3 - Operations Agent for NonStop User Guide


OVNM Host Installation Client 14
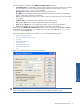
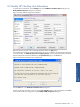
The following fields are displayed in the OVNM Host Installation Client dialog box.
• Configuration Name: This field displays the name of the configuration where the OVNM Agent is installed.
This is useful when you want to install multiple OVNM backend environments. Refer to Appendix E
Installing Multiple Agents on Same NonStop for details.
Managed Host: This field displays the node name of the HP NonStop Server
• Host Address: This field displays the IP address of the HP NonStop host server selected in the Managed
Host box. DNS name of the server is also allowed.
• Version: This field displays the product version number. It will also include information about patches that
were applied.
• Installation Date: This field displays date of Installation of the OVNM product.
• Help: Click the Help button to view the OVNM Host Installation Client Help file.
• About: Click the About button to view details of the product version and copyright information.
• Close: Click the Close button to exit from the OVNM Host Installation Client dialog box.
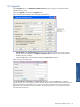
When you open the OVNM Host Installation Client for the first time, all the buttons except for New and Import
are disabled. To get the information, you can either add a new node using the New button, or import a host
configuration using the Import button.
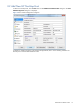
Using the OVNM Host Installation Client dialog box, you can perform the following functions.
• Add New HP NonStop Host
• Modify HP NonStop Host Information
• Upgrade
• Delete HP NonStop Host
• View Host Detail
• Import Host Configuration
• Export Host Configuration
• Tools
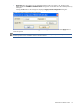
Figure 2-3 OVNM Host Installation Client Dialog Box Buttons
NOTE:
Refer to Appendix H: Customizing OVNM Configuration Files, for procedures to make custom changes
to the OVNM configuration files that are not supported via the OVNM Host Installation Client.
OVNM Host Installation
Client