
OVNPM 1.5.2 - Performance Agent for NonStop Display Agent Guide


Exporting Data: DataSet 147
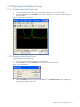
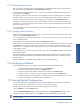
12-3-2 Starting Data Extraction
After you select the granularity and time unit parameters, you must define the starting point for data extraction.
This can be done using the From area in the Time Parameters dialog box.
To define the point when data extraction starts, in relation to the amount of time before data extraction stops,
enter a number in the Offset box.
For example, you choose month as the time unit, and an offset of 2 months as the starting point. You decide to
stop data extraction at the current time, which is July 24th. DataSet displays results from June 1st to July 31st.
To choose a data extraction period that varies according to the current time, select the Floating check box.
For example, you choose month as the time unit, and an offset of 2 months as the starting point. You select the
Floating box. You stop data extraction at the current time, which is July 24th. DataSet displays results from May
24th to July 24th at 11:59:59.
You can also select an exact time to start data extraction. Select the Time radio button and enter the time in the
corresponding boxes.
12-3-3 Stopping Data Extraction
After you choose the time that data extraction starts, you must choose the time when the extraction stops. You use
the To area in the Time Parameters dialog box.
You can define the point when data extraction stops, in relation to its starting point. You can also select an exact
time to stop data extraction.
To stop data extraction at the current time, select the Current Time radio button.
To select a time to stop data extraction, in relation to an amount of time after the extraction starts, enter a number
in the Offset box. For example, you choose day as the time unit. You decide to start data extraction on July 22,
1996. You want to stop data extraction 14 days after July 22nd. You enter an offset of 14. The closing date is
14 days after July 22nd.
To stop data extraction at an exact time, other than the current time, select the Time radio button. Enter a date In
the corresponding boxes.
After choosing all the time parameters, the dialog box displays the data extraction interval and the estimated
data size. Estimated data size refers to the estimated number of data extraction values in the tabular report for
the selected metric.
Click on the OK button. The DataSet window displays the metric with its parameters.
12-4 Modifying a DataSet
From the DataSet tab page, you can modify a DataSet or the metrics that comprise the DataSet.
• To delete a DataSet, select the DataSet and click on the Delete button.
• To rename a DataSet, select it and click on the Rename button.
• To remove a metric from the DataSet, select the metric and click on the Remove button.
• To replace a metric, or change the metric unit, select the metric and click on the Metric button.
• To change the order that a metric appears in the tabular report, select the metric and use the arrows to
move the selected metric to a different position in the Metric list.
12-5 Saving DataSet Configurations
You can save a description of the configuration of all user-defined dashboards as a text file. This information
provides a summary of your configuration, which you can use for backup purposes.
The following procedure explains how to export DataSet configurations to a text file.
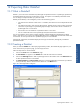
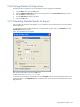
1.From the Node menu, select the Export option.
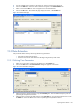
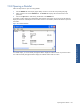
2.Select the DataSet Configurations option from the displayed menu. The Export DataSets dialog box opens.
3.Choose a folder to save the file and click on the Save button. The configurations save as a text file.
NOTE: When you export DataSets that contain user-defined metrics, a description of the formula of the metric
is saved in the file.
Exporting Data: DataSet