
OVNPM 1.5.2 - Performance Agent for NonStop Display Agent Guide

Dashboards 50
5-10-2 Creating New Time Reference
If the time reference and interval you need are not included in the list, follow the steps below to add a new
reference.
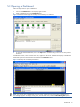
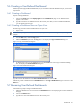
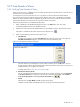
1. From the dashboard window’s Options menu, select the Time Reference option. This displays the Time
Reference Selection dialog box.
2. In the Time Reference Selection dialog box, click on the Create button. The Trend Time Reference dialog
box opens.
Figure 5-13 Trend Time Reference Dialog Box
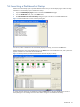
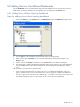
3. Select the mode as History or Profile using the corresponding radio buttons in the Mode area.
4. Select a report interval using the Interval spin box. You can select any day, month, or year; however, day
is not an available selection for the profile mode.
5. Select a report period using the Period box. You indicate the ending day for the month interval, and the
ending month for the year interval. For example, if the report interval is a month, and you want the report
to include all the days of the month, you need to select an ending day of 30 or 31 in the Period box.
6. To change the right most hour in the view, select the new hour using the Wrap after Hour box.
7. To exclude data for certain days or time periods from the view, select the days and time from the Hours
and Days list boxes in the Exclude area. You can select more than one hour and day from the list.
8. Click on the OK button to complete the process of creating a time reference.
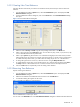
5-10-3 Removing Time Reference
Steps for removing time reference:
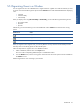
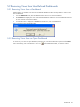
1. From the dashboard window’s Options menu, select the Time Reference option. This displays the Time
Reference Selection dialog box.
2. Select the time reference to be deleted from the list and click on the Delete button.
3. A confirmation dialog box appears on the screen.
Figure 5-14 Delete Time Reference Confirmation Box
Click on the Yes button to confirm your choice.
You can click on the Delete All button in the Time Reference Selection dialog box to delete all the time references.