
OVNPM 1.5.2 - Performance Agent for NonStop Display Agent Guide

Using Views: SystemInsight 64
6-5 Using Metrics to Build Views
A metric is a discrete measurement calculated from system values collected by OVNPM. When you use metrics to
build views, you have the ability to supervise related activities during the same time interval.
You can choose up to 16 real-time metrics to be shown at the same time in a view. However, each combined
metric is counted as only one metric. Selected metrics that form a combined metric are not counted individually.
For details, refer to the Selecting Metrics to Combine topic in Chapter 14: Creating SystemInsight Metrics.
If a domain does not have a view with the metrics that you need, you can create a new view or modify an
existing view to fit your requirements.
Refer to the Exploring Domains topic.
6-5-1 Copying an Existing View
When you copy a view, you can add, replace, and remove metrics from an existing view to create a view. In this
case, select a view that contains a set of metrics that is similar to the view you want to create.
You cannot modify metrics in a view supplied by OVNPM. To change metric selection in the OVNPM view, you
must first copy the supplied view.
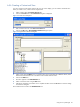
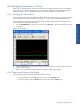
1. Select a view from the Available Views list in the Views tab page. The metric(s) of the selected view are
displayed in View Contents box.
2. Click on the Duplicate button. A copy of the view appears in the Available Views box. The duplicated view
has the same name as the original view with the word copy and a number if you make more than one
copy. For example, if the name of the selected view is CPU-BUSY, the name of the duplicate view is CPU-
BUSY copy.
6-5-2 Adding Metrics to a User-Defined View
When you select a view, the View Contents box displays the metrics that make up the view. To add a metric to a
user-defined view, you must use the Modify Insight View dialog box.
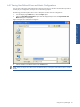
1. Select a user-defined view from the Available Views list.
2. Click on the Modify button. Display Agent displays the Modify Insight View dialog box. The Selected
Metrics box lists the metrics, which comprise the selected view.
3. Select a metric from the Metrics box that is associated with the chosen domain.
4. Click on the Add button. The metric appears in the Selected Metrics box.
5. The Units box displays the chosen domain with a list of available units. Select a unit for the new metric in
the Units box.
6. The unit appears next to the metric. In the Selected Metrics box, you can change the order of the metrics.
Click the up or down arrows to move a selected metric to a different position in the Metric list.
7. Click on the OK button to close the dialog box. The selected view displays the new metric in the View
Contents box.
6-5-3 Adding a Metric to a View with Different Units
Steps to add metric to a view with different units:
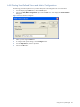
1. Select a user-defined view from the Available Views list box.
2. Click on the Modify button. The Modify Insight View dialog box opens.
3. Select one metric, and then click on the Add button.
4. Select all the available units for that metric in the Units box.
5. Click on the Repeat button. The Selected Metrics box displays the same metric with each unit.
6. Click on the OK button.
NOTE: To gain access to metrics from other domains, select the alternative domain from the Metrics list in the
Modify Insight View dialog box. The Metrics list displays the corresponding metrics.