
OVNPM 1.5.2 - Performance Agent for NonStop Display Agent Guide

Using Views: SystemInsight 81
6-9-4 Setting a Marker
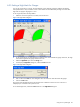
Setting a marker is the way to set your own reference point for a metric. OVNPM draws a line in the display at
the marker value. This makes it easier to notice when a metric value reaches a high or low point.
Actual performance can be measured against the visual level highlighted by the marker. A view can contain a
single marker or a separate marker for each metric.
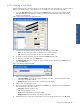
1. Select the view. If the legend is not visible, maximize the view.
2. If you want to set a marker for an individual metric, select the metric in the legend. Otherwise, a single
marker is set for all metrics in the view.
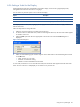
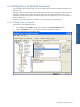
3. Select the Marker option from the menu appropriate to the current view mode. This displays the Marker
dialog box.
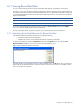
Figure 6-21 Marker Dialog Box
4. Select the Level check box.
5. Enter a value in the Level box. The maximum value allowed is shown in the dialog box.
6. Click on the OK button. The marker value(s) are displayed in the legend. As soon as the view is
redisplayed, you can restore it to its previous size.
To turn off the marker, uncheck the Level check box in the Marker dialog box.
Using Views: SystemInsight