
OVNPM 1.5.2 - Performance Agent for NonStop Display Agent Guide

Using Views: SystemInsight 82
6-9-5 Setting a High Mark for Gauges
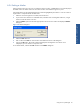
You can set a high mark in a gauge. This mark delimits an area distinctly colored or shaded in the display.
Actual performance is easy to notice if a metric value reaches the area delimited by the high mark. The same
high mark can apply to all gauges in a view.
To set a high mark, follow the steps bellow:
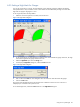
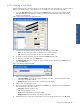
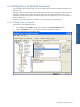
1. Select the view. If the legend is not visible, maximize the view.
Figure 6-22 High Mark Dialog Box
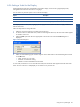
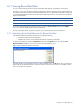
2. To set a high mark for an individual gauge, select the metric name beneath the gauge. Otherwise, this high
mark value is applied to all gauges in the current view.
3. Select the High Mark option from the Gauge menu.
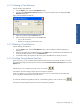
4. In the displayed High Mark dialog box, select the Level check box.
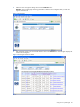
Figure 6-23 High Mark Dialog Box
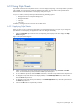
5. Enter a value in the Level box. The dialog box shows the maximum value allowed for the gauges.
6. Click on the OK button.
The portion of the gauge(s) beginning with the high mark is shaded or colored. As soon as the view is
redisplayed you can restore it to its previous size.
To turn off the high mark, uncheck the Level check box in the High Mark dialog box.