
OVNPM 1.5.2 - Performance Agent for NonStop Server Management Guide


Installing OVNPM Server Components on Windows Workstation 17
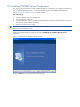
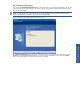
Step E: Confirm Entries and Copy Files
The next screen, Check Setup Information, displays the current settings, which have been selected so far. In case
you want to change any of the settings, you can do so by going back to the particular screen before you start
copying the program files.
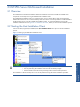
NOTE: You should check the location of the directory where OVNPM is to be installed. In case the location
has to be changed after installation, you will have to reinstall OVNPM.
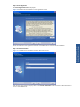
Figure 2-5 OVNPM Server Check Setup Information Screen
The Check Setup Information screen shows the information that the user had entered for confirmation. Use the
Back button to change the installation directory. To move on with the installation process, click on the Next
button. The program begins copying files to the directory specified.
Installing OVNPM Server
Components on Windows
k