HP Data Analyzer User and Installation Guide Part number: 586770-002 First edition: 07/2009
Legal notices Hewlett-Packard makes no warranty of any kind with regard to this manual, including, but not limited to, the implied warranties of merchantability and fitness for a particular purpose. Hewlett-Packard shall not be held liable for errors contained herein or direct, indirect, special, incidental or consequential damages in connection with the furnishing, performance, or use of this material.
Contents Preface Before You Begin ..................................................................................................................................... 5 Who Should Read This Guide ................................................................................................................... 5 Goals of Documentation ........................................................................................................................... 5 Organization ..................................
7 Uninstalling HP NonStop Data Analyzer 7-1 7-2 Uninstalling Data Analyzer Web Server.......................................................................................... 58 Uninstalling Data Analyzer Database ............................................................................................. 60 Appendix A Web Configuration Parameters................................................................................................................
Preface Data Analyzer (DA) helps drive performance success by representing your business using striking and meaningful visuals in consolidated business-oriented views. Before You Begin As the Data Analyzer administrator, you should be familiar with the ATM/POS environment, HP NonStop Servers, network protocols, Microsoft SQL Server, Microsoft IIS, client/server architecture and basic Microsoft Windows navigation.
1 Data Analyzer: Overview This chapter lists the main features of Data Analyzer (DA) and highlights the advantages this software offers. 1-1 What is Data Analyzer? Data Analyzer is a best-of-breed web-based visualization tool providing graphical presentation of information. It allows you to easily combine a multitude of data elements from various sources to create a unified view of your processing environment that is like no other.
1-3 Features & Benefits Unified Views Data Analyzer allows you to easily combine a multitude of data elements from various sources to create a unified view of your processing environment that is like no other. Driving Performance Success Data Analyzer helps drive performance success by representing your business using striking and meaningful visuals in consolidated business-oriented views. It is not uncommon for corporate departments to run thousands of reports that are of no use to decision makers.
2 Installing Data Analyzer This section covers the procedure to install Data Analyzer on the Microsoft Windows platform. 2-1 Contents of Installation Exe Data Analyzer Database The DA_DatabaseInstallation.exe contains components necessary to install Data Analyzer Database on a Windows workstation. The self-extracting exe file includes the following: DA Database For collecting data related to dashboards, panel configurations, and database connection strings.
2-2 Prerequisites Before installing Data Analyzer, ensure that the following tasks have been accomplished: 1. The user installing Data Analyzer must have Administrator rights/privileges on the system. 2. Before starting the installation, it is recommended that you exit from any other Windows programs that are running. 3.
2-3 Installing Data Analyzer on Windows 2-3-1 Overview Installing Data Analyzer involves installing the following components in the same sequence. • Data Analyzer Database: This involves installing the Data Analyzer database, remotely or locally. • Data Analyzer Web Server: This involves installing Data Analyzer Web components: ASPX and HTML files. NOTE: The various Data Analyzer components can be installed on the same machine or on different machines. 2-3-2 Getting Started 1.
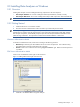
2-3-3 Installing Data Analyzer Database Step A: Starting Up Double-click on the DA_DatabaseInstallation.exe to start the installation process. Install Shield prepares the Setup program for use and the Data Analyzer Database Setup Welcome screen is displayed. Installing Data Analyzer Figure 2-2 Data Analyzer Database Setup Welcome Screen Click on the Next button to continue with Data Analyzer Database Setup. Step B: License Agreement The License Agreement screen is displayed.
Step C: Destination Location Figure 2-4 Data Analyzer Database Setup Choose Destination Location Screen The Choose Destination Location screen shows the path of the folder where Data Analyzer Database files will be installed by default. Use the Browse button to specify a directory other than the default. To move on with the installation process, click on the Next button. NOTE: While installing DA with Performance Monitor, the default directory location will be C:\Program Files\OVNPM.
Step E: Option Type Figure 2-6 Data Analyzer Database Select Option Type Screen The Select Option Type screen is displayed. Select the database option that best suits your needs. Choosing the Create only DVDB Tables option will create only the Data Analyzer tables. It is assumed that the DVDB database has been created manually. You need to have the DVDB database db_owner and public rights. Click on the Next button to continue. Steps to Manually Create DVDB Database 1.
Step F: Select Database Option Type Figure 2-7 Data Analyzer Database Select Option Type Screen The Select Option screen is displayed again. Use this screen to integrate Data Analyzer with ATM/TA, POS/TA or OVNPM - PM database. To integrate Data Analyzer with any of the database, select the corresponding check box. Click on the Next button to continue.
Step H: Confirm Entries and Copy Files Figure 2-9 Data Analyzer Database Check Setup Information Screen NOTE: You should check the location of the directory where Data Analyzer Database is to be installed. In case the location has to be changed after installation, you will have to reinstall the software. Click on the Next button to continue with the Setup process. The program begins copying files to the directory specified.
Step J: Setup Complete Figure 2-11 Data Analyzer Database Setup Completed Screen The Data Analyzer Database Setup Completed screen denotes the completion of the Setup process. The Open database log files check box is selected by default. If you do not wish to open the database log files, deselect the check box. Click on the Finish button to complete the Setup process. This completes the Data Analyzer Database Setup process.
2-3-4 Installing Data Analyzer Web Server Step A: Starting Up Double-click on the DA_WebServerInstallation.exe to start the installation process. Install Shield prepares the Setup program for use and the Data Analyzer Web Server message box is displayed. Figure 2-12 Data Analyzer Web Server Message Box Before installing Data Analyzer Web Server make sure that the Data Analyzer Database is installed on the network.
Step C: License Agreement The License Agreement screen is displayed. Figure 2-14 Data Analyzer Web Server Setup License Agreement Screen Review the software license agreement and click on the Yes button to continue with the installation. Step D: Destination Location Figure 2-15 Data Analyzer Web Server Setup Choose Destination Location Screen The Choose Destination Location screen shows the path of the folder where Data Analyzer Web Server files will be installed by default.
Step E: Database Server Figure 2-16 Data Analyzer Web Server Setup Database Server Screen After selecting the Database Server, select the authentication type: Windows authentication or SQL Server authentication, using the corresponding radio buttons. Specify the Login ID and the Password if you select the SQL Server authentication method. Click on the Next button to continue.
Step G Data Analyzer Web Server – Installation Complete Figure 2-18 Data Analyzer Web Server Message Box The next screen gives information that the Data Analyzer Web Server has been successfully installed on the system. Click on the OK button to complete the Setup. Step H: Setup Completed Figure 2-19 Data Analyzer Web Server Setup Completed Screen The Data Analyzer Web Server Setup Completed screen denotes the completion of the Setup process. Click on the Finish button to complete the Setup process.
2-4 Upgrading Data Analyzer to Version 2.0 This section explains the procedure to upgrade from a previous version of Data Analyzer to version 2.0. 1. Take a backup of the DVDB database on the SQL Server. 2. To upgrade the DVDB Database, run the DAUPGRADE.sql on DVDB database using the SQL Analyzer. 3. The next step is to upgrade the Data Analyzer Web Server a. Run the Data Analyzer Web Server installation exe.
c. The Database Server screen is displayed. Select the Database Server where the Data Analyzer Database DVDB exists using the Database Server field. You can also browse for the Database Server using the Browse button. The default port used by the SQL Server is 1433. In case the SQL Server is listening on a port other than the default port, specify the information in the , format.
3 Getting Started with Data Analyzer This chapter details the steps for starting and checking status of various Data Analyzer components. 3-1 Accessing Data Analyzer Web Server Data Analyzer provides a platform and location independence by giving the ability to monitor data through a web browser like Microsoft Internet Explorer.
Associated with each logon is a profile, which determines the information a user can view. The admin logon has special privileges, and can edit the profiles and passwords of other users. You need to enter the user name and the password in the User Name and Password fields respectively, to access the Data Analyzer web page. NOTE: The default administrator User Name is admin and Password is dvdefault. You can change the password by editing the Admin profile.
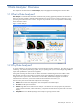
3-2 Admin Privileges NOTE: This function can only be accessed by the Data Analyzer Administrator or a user with Admin privileges. You can use the Administrator page to modify/access the Admin privileges. Click on the Admin option in the Data Analyzer web page Dashboards menu. Figure 3-2 Data Analyzer Dashboards Menu Admin Option Clicking on the Admin option displays the Administration page.
3-2-1 Adding a New User 1. Click on the Admin option in the Data Analyzer web page Dashboards menu. 2. In the displayed Administration page, click on the New User button. This displays the New User dialog box. Figure 3-4 New User Dialog Box 3. 4. Enter the User Name and Password in the corresponding fields. Select the privilege category using the Privileges drop-down box. The options available are: • Power User • Admin • Restricted User • Restricted (allow changes) 5.
3-2-2 Modifying a User Follow the steps listed below to modify the user settings. 1. Click on the Admin option in the Data Analyzer page Dashboards menu. This displays the Administration page. The Users tab page is displayed by default. Figure 3-5 Administration Page 2. Select the user whose password/privileges are to be modified. 3. To modify the password, click on the Set Password button. This displays the Set Password dialog box. 4. Enter the new password in the Password field. 5.
3-2-3 Deleting a User Follow the steps given below to delete a user: 1. Click on the Admin option in the Data Analyzer web page Dashboards menu. This displays the Administration page Users tab page. 2. Select the user to be deleted from the User Name list. 3. Click on the Delete User button. A confirmation box is displayed. Click on the OK button to delete the selected user.
3-3 Configuring Data Sources You can also configure the data sources according to your business requirements. 3-3-1 Configure a New Data Source Follow the steps given below to configure a new Data Source. 1. Click on the Admin option in Data Analyzer Dashboards menu. This displays the Administration page. 2. Click on the Data Sources tab to open the corresponding tab page. The Data Sources tab page displays a list of all the data sources configured along with the corresponding descriptions.
4. 5. Enter the following information in the New Data Source dialog box. • Data Source Name: Name of the Data Source. • Data Source Type: Type of the Data Source to be created. The options available are PM, TA, Table and TELCO • DB Server: Name of the Database Server. • DB Name: Name of the Database. • DB Authentication: Select the type of Database authentication using the DB Authentication drop-down list. The options available are SQL and Windows.
4. Click on the New Parameter button to add a new parameter for the selected data source. This displays the New Parameter dialog box. Figure 3-12 New Parameter Dialog Box 5. Enter the new Parameter Name and Parameter Value in the respective fields and click on the OK button to add the new parameter. 6. This will add the new parameter to the existing list. 3-3-2-1 Modify a Parameter Perform the following steps to modify a Data Source parameter: 1.
3-3-3 Delete a Data Source Follow the steps given below to delete a data source: 1. Click on the Admin option in Data Analyzer Dashboards menu. This displays the Administration dialog box. Click on the Data Sources tab to open the corresponding tab page. 2. Select the data source to be deleted from the Data Source Name list. 3. Click on the Delete Data Source button. A confirmation box is displayed. To delete the selected data source, click on the OK button.
3-4 Error Log Data Analyzer provides the facility of capturing all the errors & warnings encountered while generating reports. This feature can be accessed using the Error Log tab page in the Administration page. Figure 3-16 Error Log Tab Page • Time: The date and time when the error occurred. • Client: The IP address of the client where the error occurred. • Subject: Details of the errors encountered. Getting Started with Data Analyzer You can select an error to see detailed information.
4 Data Analyzer Interface 4-1 Overview Seeing and interacting with data are the two factors essential for understanding the answers hidden in them. Imagine being able to marry your data, for example, transaction data, device state data, CPU busy, network busy and disk busy statistical information to determine exactly what caused a problem at 3:12 PM on Tuesday. You will no longer need to guess what caused performance problems on your network.
4-2 Dashboards Browser Figure 4-2 Data Analyzer Dashboards Browser • Dashboard: Name of the Dashboard • Panels: Lists all the Panels configured in a Dashboard. • Entities: Entities to be displayed in a Panel. • Filtering Criteria: Individual filter conditions in a filter. Data Analyzer Interface Data Analyzer provides a powerful dashboard object browser that displays all the configured Dashboards in a Tree outline. This tree browser provides single click refresh to the Dashboard objects.
4-3 Available Data Sources Browser Figure 4-3 Data Analyzer Available Data Sources Browser Data Analyzer provides wrappers for most of the major databases. The browser displays the information at the following levels: • Data Source: The Name of the data sources configured with Data Analyzer. • Data Source Elements: Lists all the names of all the elements in the selected Data Source. • Timeframes: List the timeframes for which the data is to be viewed. For example: 5 Minutes, Hourly and Daily.
4-4 Data Source Explorer Figure 4-4 Data Analyzer Data Source Explorer The Data Source Explorer is displayed as a tab on the right pane of Data Analyzer. The tab is displayed as Select a Data Source to Browse when no Data Source is selected from the Available Data Sources browser. The explorer lists all the Data Source element entities in the selected timeframe. Data Analyzer Interface The Data Source Explorer can also be used to update the Host information using the corresponding box.
4-5 Dashboards Figure 4-5 Data Analyzer Dashboards Data Analyzer has been designed keeping it in mind that the worth of data depends upon the ability to access it, analyze it, interpret it, and communicate it. The goal is to make the vital information accessible to the people who need it to make decisions, in a way that is easily and correctly communicated.
The Data Analyzer Dashboards can be used to dynamically create graphs, charts and grids for meaningful displays of your most important data assets. This topic covers how to create and maintain Dashboards. 5-1 Create a New Dashboard Follow the steps given below to create a new dashboard. 1. Click on the New Dashboard option in Data Analyzer web page Dashboards menu. Figure 5-1 Dashboards Menu 2. Clicking on the New Dashboard option displays the Dashboard Configuration dialog box.
3. Enter the following details in the corresponding fields: • 4. Dashboard title: Enter the name of the dashboard to be created. • Host name (filter): This field can be used to filter the transactions from the specified Host. • Time offset (minutes): This field can be used to specify the difference between the GMT and LCT time in minutes. • Number of intervals: Select the number of intervals from the drop-down list. • Refresh Interval: Select the data refresh interval.
Once Dashboards are created and configured, the next step is to add panels to it. Panels define the entities that would be displayed in the dashboard view. Follow the steps given below to add panel(s) to a dashboard. 1. Select the dashboard from the Dashboard Explorer and right-click on it. Select the New Panel option from the displayed right-click menu. Figure 5-3 Data Analyzer Dashboard Right-Click Menu 2. The Panel Configuration dialog box is displayed with Panel Config tab page by default.
3. Panel Config Options The Panel Config tab is the first tab available in the Panel Configuration dialog box. Enter the following configuration information in the Panel Config tab page. • 4. Panel title: Displays the name of the Panel as specified during creation of the panel. • Host name (filter): This field can be used to filter the transactions from the specified Host. • Time offset (minutes): This field can be used to specify the time offset in minutes.
Indicators Config Tab Page: The Indicators Config tab page is displayed when you select the Panel Type as Indicators in the Panel Config tab page. 8. • Series name: Select the series name for the panel from the drop-down list. The options available are: Add counter name and Entity name only. • Y-Axis 1,2 Data Type: Select the type of data using the Data Type drop-down list. The options available are Default, Percent and Currency.
5-3 Adding Data to Panels Follow the steps below to add data to be displayed in the Dashboard panels. 1. Select the Dashboard panel in the Dashboards Browser. 2. All the available data sources configured with Data Analyzer are displayed in the Available Data Sources Browser panel in a tree-view, along with the data elements and the timeframes. Select the Data Source – Data Source Element – Timeframe, (for example ATMTA – Acquirer- Daily ) in the Available Data Sources Browser.
Select the Filter type using the corresponding box. The options available in the Filter Type drop-down list are: • Select Top Entities: This option will allow you to select and display the statistics of N number of entities from the top. • Select Bottom Entities: This option will allow you to select and display the statistics of N number of entities from the bottom. • Select Filter: This option will allow you to select the filter to be applied. Enter the filter specifications using the Select If field.
Figure 5-8 Filter Display Option Dialog box • Specify the threshold name and color using the Series name / color field. • Select the type of chart to be displayed using the Chart Type drop-down field. The options available are: Default, Line, Spline, Column, Stepline, and Point. • Specify the value to be used for the Y-axis using the corresponding box. The options available are First (left) and Second (right). • Enter the threshold specifications using the various fields in the Thresholds area.
Perform the following steps in order to view the data source of a selected entity: 1. Select the entity from the panels available in a dashboard whose data source is to be viewed and right click on it. Figure 5-9 Data Analyzer Panel Right-Click Menu 2. Select the Data Source Options from the displayed right-click menu. This will display the Data Source Options dialog box.
3. 4. Specify the following information in the dialog box: • Data source interval: Select the data source interval. • Counters type: Select the type of counter, for example, Raw/Default. • Use as marker: Specify to use as marker using the drop-down box. • Host name (filter): This field can be used to filter the transactions from the specified Host. • Scale data by: Specify the data scaling parameter.
Follow the steps listed below to view a Dashboard. 1. Select the dashboard you want to view from Dashboard Explorer and right-click on it. 2. Select the View Dashboard option from the displayed right-click menu. Figure 5-11 Dashboard Right-Click Menu – View Dashboard Option Clicking on the View Dashboard option displays the Dashboard as a tab in the Dashboards pane on the right side.
5-6 Cloning a Panel Follow the steps listed below to clone a Panel. 1. Select the Panel you want to clone from Dashboard Explorer and right-click on it. 2. Select the Clone option from the displayed right-click menu. Figure 5-12 Panel Right-Click Menu – Clone Option 3. The Panel Configuration dialog box is displayed. Perform the required changes in the various fields available. Figure 5-13 Clone Panel dialog Box 4. Click on the OK button. This creates a clone of the existing panel.
Perform the following steps to delete an existing panel: 1. Select the panel to be deleted from the panels available in the dashboard. 2. Select the Delete option from the panel right-click menu option. 3. A confirmation box is displayed. Click on the OK button to delete the selected panel. The panel will be deleted from the list of panels.
5-8 Cloning a Dashboard Follow the steps listed below to clone a Dashboard. 1. Select the dashboard you want to clone from Dashboard Explorer and right-click on it. 2. Select the Clone option from the displayed right-click menu. Figure 5-14 Dashboard Right-Click Menu – Clone Option 3. The Dashboard Configuration dialog box is displayed. Perform the required changes in the various fields available. Figure 5-15 Clone Dashboard dialog Box 4. Click on the OK button.
Perform the following steps to delete an existing dashboard: 1. Select the dashboard to be deleted from the Dashboards Browser. 2. Select the Delete option from the dashboard right-click menu option. 3. A confirmation box is displayed. Click on the OK button to delete the selected dashboard. The dashboard will be deleted from the dashboard panel.
5-10 Dashboards Drill-Down Feature Data Analyzer is a Web-based operational too that enables any user to create, monitor, analyze, and drill down into any KPI across the enterprise. Vital KPI measurements can now be accessed and used without the complexities associated with traditional data gathering, collaboration, and calculation. Dashboards are the new face of information management.
1. Edit Panel Options: The icon allows you to edit the Panel Configuration. You can select the corresponding options to change the view of the graphical representation according to your requirements. 2. Refresh Panel: The 3. Apply Filter Expression: The names. Use 4. View Options: The icon will refresh the data displayed. icon will allow you to apply the filter condition on the data source column icon to remove the filter condition.
5-12 User Profile Options The Profile option is available on the top most right corner of the user interface and provides options to perform user profile related tasks. Clicking on the option displays the following options. Preferences The Preferences option enables you to configure Data Analyzer preferences. Selecting the option displays the Configure Preferences dialog box.
6 Data Source Actions Data Analyzer provides the functionality of assigning action(s) to various Data Source elements displayed in the Available Data Source browser. Follow the steps listed below to add actions. 1. Select the Data Source elements from the Available Data Source browser. 2. Perform a right-click action and select the Actions option from the displayed right-click menu. The Edit Actions dialog box is displayed. Data Source Actions Figure 6-1 Edit Actions Dialog Box Browser 3.
7 Uninstalling HP NonStop Data Analyzer This chapter provides instructions on how to uninstall Data Analyzer from the workstation. The uninstallation of Data Analyzer on Windows involves uninstalling the following components in the specified sequence: • Data Analyzer Web Server • Data Analyzer Database 7-1 Uninstalling Data Analyzer Web Server Follow the steps given below to uninstall the Web Server components from the workstation.
Step D: Rebooting the System It is recommended to reboot the system for proper functioning. The Data Analyzer Web Server Uninstallation message box is displayed. Figure 7-3 Data Analyzer Web Server Uninstallation Message Box Click on the OK button to continue. Uninstalling HP NonStop Data Analyzer NOTE: Clicking on the OK button does NOT reboot the system. It is recommended to reboot the system after uninstalling the Data Analyzer Web Server.
7-2 Uninstalling Data Analyzer Database Follow the steps given below to uninstall the Data Analyzer Database components from the workstation.
Appendix A Parameter Description ChartHttpHandler Specifies the time duration to load the charts available. Default: 600 seconds EnableUserPrefs Enable/disable the user preferences option. Default: 1 StatChartMaxNumSeries Displays the maximum number of entities.
Appendix B Data Analyzer Integration with any Data Source Integrating Data Analyzer with Transaction Analyzer Data Source Follow the steps given below to integrate Data Analyzer with Transaction Analyzer data source: Using Install Shield While installing Data Analyzer Database, Select Option screen is displayed. Use this screen to integrate Data Analyzer with ATM/TA or POS/TA database using the corresponding check boxes. Click on the Next button to continue.
The Database Server screen is displayed for integration with the selected (ATM/TA or POS/TA) database. Select the Database Server where the database is to be created or exists using the Database Server field. The default port used by the SQL Server is 1433. In case the SQL Server is listening on a port other than the default port, specify the information in the , format.
3. Click on the New Data Source button to add a new Data Source. This displays a New Data Source dialog box. Figure B-4 New Data Source Dialog Box Enter the following information in the New Data Source dialog box. • Data Source Name: Name of the Data Source. For example, POSTA Data Source. • Data Source Type: Type of the Data Source to be created. The options available are PM, TA, Table and TELCO. Select TA option for integrating with TA database. • DB Server: Name of the Database Server.
This displays the POS/TA database integrated with Data Analyzer under Available Data Source Browser area.
Appendix C Integrating Data Analyzer with PM Data Source Follow the steps given below to integrate Performance Monitor data source with Data Analyzer using install shield: Installing Data Analyzer Database with Performance Monitor 1. Place the setup.ini file at the same location where the installation exes are placed. The INI file contains the following parameters: CompanyName=HP ProductIntegration=PM Specify ProductIntegration as PM, if you want to integrate Data Analyzer with Performance Monitor. 2.
6. The Select Option screen is displayed again. Use this screen to integrate Data Analyzer with PM database. Appendix C Figure B-2 Data Analyzer Database Select Option Type Screen To integrate Data Analyzer with any of the database, select the corresponding check box. Click on the Next button to continue. 7. The Database Server screen is displayed for integration with the PM (InsightCollectDB) database.
8. The Check Setup Information screen displays the current settings, which have been selected so far. Figure B-4 Data Analyzer Database Check Setup Information Screen In case you want to change any of the settings, you can do so by going back to the particular screen before you start copying the program files. Click on the Next button to continue with the Setup process. The program begins copying files to the directory specified. 9. It is recommended to reboot the system to complete the installation.
1. Double-click on the DA_WebServerInstallation.exe to start the installation process. Before installing Data Analyzer Web Server make sure that the Data Analyzer Database is installed on the network. 2. The Data Analyzer Web Server Setup Welcome screen is displayed. Click on the Next button. 3. The License Agreement screen is displayed. Review the software license agreement and click on the Yes button to continue. 4.
7. The next screen gives information that the Data Analyzer Web Server has been successfully installed on the system. Click on the OK button to complete the Setup. 8. The Data Analyzer Web Server Setup Completed screen is displayed. Figure B-7 Data Analyzer Web Server Setup Completed Screen The screen denotes the completion of the Setup process. It is recommended to reboot the system for proper functioning. This will integrate PM data source with Data Analyzer.
Document Feedback Form We would appreciate your comments on the Data Analyzer User and Installation Guide. After you have read the Guide and used the software, please take a few moments to complete this form and return it to appropriate HP product support service. The organization of the Guide makes it easy to locate topics quickly. Strongly Disagree 1 2. Strongly Agree 2 3 4 The appearance of the pages makes it easy to locate information quickly. Strongly Disagree 1 3.
9. The level of writing in this book is: Too Basic Just Right Too Technical (Please be specific.) 10.