
OVNPM 1.5.2 - Performance Data Analyzer User and Installation Guide


Installing Data Analyzer 10
2-3 Installing Data Analyzer on Windows
2-3-1 Overview
Installing Data Analyzer involves installing the following components in the same sequence.
• Data Analyzer Database: This involves installing the Data Analyzer database, remotely or locally.
• Data Analyzer Web Server: This involves installing Data Analyzer Web components: ASPX and HTML files.
NOTE: The various Data Analyzer components can be installed on the same machine or on different machines.
2-3-2 Getting Started
1. Install the SQL Server on a Windows machine.
2. Decide on the kind of Authentication mode to be used in your Data Analyzer Environment.
NOTE: If you change your SQL Server login ID and password (in case of SQL Server Mixed Mode
authentication) or Windows login ID and password (in case of Windows authentication mode) after installing
Data Analyzer components, use the Modify or Repair option for Data Analyzer Database and Web Server to
update the login information. The sequence for maintenance should be Database -> Web Server.
Windows Authentication Mode
For Windows Authentication mode, create users according to the following scenarios:
• Work Group: Create User(s) for the Database with the user name and password. Ensure that the user(s)
have Administrator Privileges and the password is not blank.
• Domain: Create a user on Domain Server having “Log on as a service" right. Make sure that the password
is not blank.
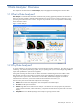
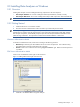
SQL Server Authentication Mode
Create a user with Database Creator rights on the SQL Server.
Figure 2-1 Adding Administrator Rights to the SQL User
3. Install PM or TA database before using Data Analyzer.