
OVNPM 1.5.2 - Performance Data Analyzer User and Installation Guide


Appendix C 66
Appendix C
Integrating Data Analyzer with PM Data Source
Follow the steps given below to integrate Performance Monitor data source with Data Analyzer using install
shield:
Installing Data Analyzer Database with Performance Monitor
1. Place the setup.ini file at the same location where the installation exes are placed. The INI file contains the
following parameters:
CompanyName=HP
ProductIntegration=PM
Specify ProductIntegration as PM, if you want to integrate Data Analyzer with Performance Monitor.
2. Double-click on the DA_DatabaseInstallation.exe to start the installation process. The License Agreement
screen is displayed next.
Review the software license agreement and click on the Yes button to continue with the installation.
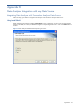
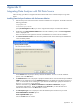
3. The Choose Destination Location screen shows the path of the folder where Data Analyzer Database files
will be installed by default.
Figure B-1 Data Analyzer Database Setup Choose Destination Location Screen
Use the Browse button to specify a directory other than the default. To move on with the installation
process, click on the Next button.
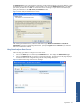
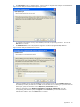
4. The Database Server screen is displayed. Specify the Database Server where the Data Analyzer Database
(DVDB) is to be created/exists using the Database Server field. The default port used by the SQL Server is
1433. In case the SQL Server is listening on a port other than the default port, specify the information in
the <SQL Server>,<Port Number> format.
Select the authentication type: Windows authentication or SQL Server authentication, using the
corresponding radio buttons. Specify the Login ID and the Password if you select the SQL Server
authentication method. Click on the Next button to continue.
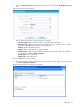
5. The Select Option Type screen is displayed. Select the database option that best suits your needs.
Create DVDB Database and Tables option or
Create only DVDB Tables option
Click on the Next button to continue.