
Pathmaker Programming Guide


Creating a Simple Application
Sample Pathmaker Sessions
10–16 067868 Tandem Computers Incorporated
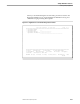
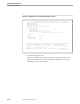
5. Enter the application installation information:
a. From the Application Configuration menu, press F3 to reach the Application
Installation screen.
b. Enter configuration information, including appropriate disk volume, printer,
and a PATHMON name for the application Pathway system.
The Command File Subvolume field should contain the name of a volume and
a subvolume where you want the Pathmaker product to create Pathway files
for you, such as PATHCOLD.
The Data File Subvolume should contain the name of a volume and a
subvolume where you want the Pathmaker product to create Enscribe data
files for you
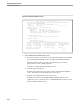
c. Specify a valid printer, Inspect terminal, log file, and CPUs for your system.
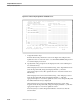
Record the name of the command file subvolume for use in Step 7 and the
PATHMON name for use in Step 9. Press F2 to update the screen.
Note Do not enter the name of the PATHMON for this Pathmaker project. Do not enter the project subvolume
for this Pathmaker project in the Command File subvolume or Data File subvolume fields. Doing so would
cause a name conflict.
d. Press shifted F16 to return to the Pathmaker Main Menu.
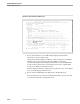
e. Check that the generation and compilation of all requesters were successful.
Press shifted F16 to exit from the Pathmaker full screen interface.
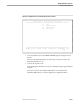
6. Use the PMPROJECT INSTALL utility to install the application. In this sample
session, the project name is XX-SESSION-1, where XX is your initials:
25> PMPROJECT INSTALL
XX-
SESSION-1
7. Use FUP to create Enscribe database files for testing your application.
From the command interpreter, enter the following commands:
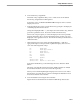
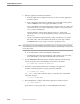
26> VOLUME $
vol
.
subvol
$
vol
.
subvol
is the volume and subvolume you named as the Command File
Subvolume in Step 5.
27> FUP /IN GENDATA/
8. Run PATHCOLD to configure and start the application’s Pathway system:
28> OBEY PATHCOLD
Ignore file error 11 messages when you run PATHCOLD the first time.