
Pathmaker Programming Guide

Creating a NonStop SQL Pathmaker Application
Sample Pathmaker Sessions
10–38 067868 Tandem Computers Incorporated
12. Define SQL-MAIN-MENU requester.
a. Enter basic requester information.
b. Write requester help text.
c. Assign function keys.
d. Specify function key prompts to be displayed on screen.
e. View default screen using the Screen Painter.
f. Generate requester.
13. Simulate screen navigation (optional).
14. Assign a server class to the server to.
15. Generate mapping requester.
16. Enter application installation information.
17. Use PMPROJECT INSTALL to install the application.
18. Run PATHCOLD to configure and start the application’s PATHWAY system.
19. Use PATHCOM to run the application.
Application Creation Steps The following pages describe the Pathmaker screens you must complete to create the
application and the steps outside of the Pathmaker environment that you must take to
install and run the application.
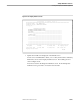
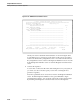
1. Create NonStop SQL catalog (if necessary):
On the Pathmaker Main Menu, note the Work subvolume name (which actually
specifies a volume and a subvolume). This name indicates your default volume
and subvolume. The default volume is where the SQL catalog and the volume
and subvolume where the tables for the application will be created. Press shifted
F13 to reach the Utility Menu. Press F7 to invoke SQLCI.
If you have not yet created a catalog, enter the following command (replacing XX
with your initials):
>> CREATE CATALOG
XX
sqlcat;
---SQL operation complete
XXsqlcat is the name of a subvolume that you could use for the SQL catalog for
this sample session. You can use any valid subvolume name you want.
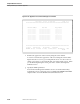
2. Create tables for the application:
From SQLCI, enter the following commands (replacing XX with your initials):
>> OBEY
XX
s3pm.sqlddl;
>> EXIT
XXs3pm is the subvolume where you copied SQLDDL.
The tables will be created on your default volume and subvolume.