
POS Transaction Analyzer User and Installation Guide, SST Version 1.2


HP NonStop POS Transaction Analyzer Reports 103
5-3 Reports Group
POS/TA provides the ability to create groups of frequently used reports to make the reporting process more
efficient.
5-3-1 Creating a Reports Group
Perform the following steps to create a Reports Group.
1. Click on the Reports option in the Tools menu in the POS Transaction Analyzer web page.
2. This will display the Create Your Own Reports Group page if no groups have been configured. If you have
already created Reports Group(s), the View Reports Group page will be displayed. If the View Reports
Group page is displayed, click on the Create option in the Reports Group menu to create a new Reports
Group.
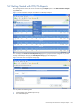
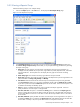
Figure 5-3 Create Your Own Reports Group
3. In the Create Your Own Reports Group page, enter the group name in the Group Name field.
4. The next step for creating a Reports Group is to select reports. The reports available are displayed in the
Select Reports for the Group area. Select a report and use the > button to add the report to the Reports
Group. To add all the selected reports to the Reports Group, click on the >> button. To remove a report
from the selected list, use the < or << buttons.
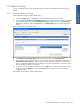
5. To save the reports group and close the page, click on the Ok button. To save the group without closing
the page, click on the Apply button. Click on the Cancel button in case you do not wish to save the
modifications made.
This completes the procedure to create a Reports Group.
HP NonStop POS Transaction
Analyzer Reports