
POS Transaction Analyzer User and Installation Guide, SST Version 1.2


Installing HP NonStop POS Transaction Analyzer 22
Step C: Destination Location
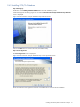
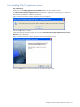
Figure 2-6 POS Transaction Analyzer Database Setup Choose Destination Location Screen
The Choose Destination Location screen shows the path of the folder where POS/TA Database files will be
installed by default. Use the Browse button to specify a directory other than the default. To move on with the
installation process, click on the Next button.
NOTE: This screen will not be displayed if POS/TA Database is already installed on the system where POS/TA
Application Server is installed.
Step D: Database Server
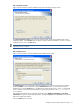
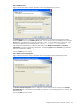
Figure 2-7 POS Transaction Analyzer Database Setup Database Server Screen
The Database Server screen is displayed. Select the Database Server where the POS Transaction Analyzer
Database (POSDB) is to be created/exists using the Database Server field. You can also browse for the
Database Server using the Browse button. The default port used by the SQL Server is 1433. In case the SQL
Server is listening on a port other than the default port, specify the information in the <SQL Server>,<Port
Number> format.
After selecting the Database Server, select the authentication type: Windows authentication or SQL Server
authentication, using the corresponding radio buttons. Specify the Login ID and the Password if you select the
SQL Server authentication method.
Click on the Next button to continue.