
POS Transaction Analyzer User and Installation Guide, SST Version 1.2

Working with HP NonStop POS Transaction Analyzer 63
4-2-7 Deleting a Panel from the View
Perform the following steps to delete an existing panel:
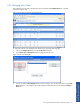
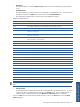
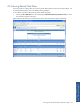
1. Click on the Configure Views link to access the My Views dialog box.
2. Select the view, from which panel(s) is to be deleted, from the Current Views box and click on the View
Panels button to display the corresponding dialog box.
3. Select the panel to be deleted from the Panels in this view box and click on the Delete button. A
confirmation box is displayed. Click on the OK button to delete the selected panel.
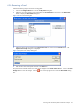
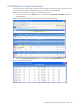
The panel will be deleted from the Panels in this view box. Click on the Save Changes button to save the
changes. Click on icon on the top right-corner to close the View Panels dialog box.
4-2-8 Changing Panel Order
To change the order of panels displayed in the POS Transaction Analyzer web page perform the following steps.
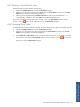
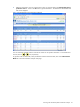
1. Click on the Configure Views link to access the My Views dialog box.
2. Select the view whose panels are to be rearranged from the Current Views box and click on the View
Panels button to display the corresponding dialog box.
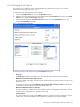
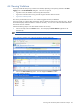
3. Use the Move Up and Move Down buttons to change the order of panels you want to display on the web
page and click on the displayed Save Changes button to save the changes. Click on
icon on the top
right-corner to close the View Panels dialog box.
Working with HP NonStop
POS Transaction Analyzer