
POS Transaction Analyzer User and Installation Guide, SST Version 1.2

Working with HP NonStop POS Transaction Analyzer 64
4-2-9 Changing Panel Options
POS/TA allows you to select the columns to be displayed for the selected entity in a panel. You can also
customize some of the display setting for a view.
To change the panels options perform the following steps.
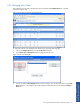
1. Click on the Configure Views link to access the My Views dialog box.
2. Select the view whose display setting are to be changed from the Current Views box and click on the View
Panels button to display the View Panels dialog box.
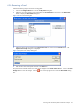
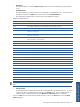
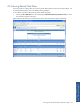
3. Select the desired panel from the Panels in this view box and click on the Panel Options button. This
displays the Panel Options dialog box.
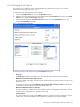
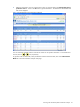
Figure 4-17 Panel Options Dialog Box
The following options can be configured using the Panel Options dialog box.
• Entity Type
The Entity Type drop-down box enables you to select the entity whose options need to be changed.
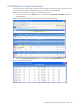
• Minimum # of transactions before entity is shown
This option constrains the display of entities until the specified number of transactions value is reached. The
default value is 1.
For example, if you have defined the Minimum # of transactions before the entity is shown as 10, POS/TA
will display only entities with total number of transactions above 10.
• Maximum visible entities (enter 0 to show all)
This option enables you to define the maximum number of entities to be displayed at all the levels. Enter 0
to display all the configured entities. The default value is 10.
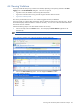
• Order by Column
This option enables you to specify column Name and order on which the information displayed in a panel
will be sorted. The options available in this drop-down list will depend on the columns selected.