
RSC/MP 7.3 Installation and Configuration Guide

Installing RSC/MP on Windows Workstations
HP NonStop Remote Server Call (RSC/MP) Installation and Configuration Guide—522358-011
4-3
Installing the Windows Vista™ Client from CD
Installing the Windows Vista™ Client from CD
To install the Windows Vista™ client software from the CD:
1. Insert the RSC/MP Windows Vista Client CD into a drive attached to a Windows
workstation.
2. Navigate to the WS_SW folder on the CD.
3. Select one of these installation methods:
a. Install directly onto the workstation attached to the CD drive by double-clicking
on the RPSETUP.MSI file.
b. Install on multiple workstations by copying the RPSETUP.MSI file to a central
workstation that can be accessed by all workstations. Log on to each
workstation and locate the RPSETUP.MSI file on the central workstation. Either
double-click on the RPSETUP.MSI file, or select Start->Run and enter the full
path of the RPSETUP.MSI file.
c. Transfer the RPSETUP.MSI file to the NonStop and then transfer
RPSETUP.MSI to the target workstation. The file must be transferred in
BINARY mode. Log on to the workstation and locate the RPSETUP.MSI file.
Either double-click on the RPSETUP.MSI file, or select Start->Run and enter
the full path of the RPSETUP.MSI file.
4. The Windows Vista client is installed as a Windows Service as a default. This is
the only supported configuration for the Vista client. See Running the RSC/MP
Windows Vista Client as a Service on page 4-9.
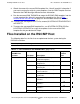
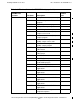
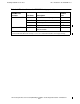
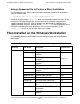
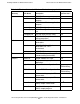
5. The files after extraction are listed in subsection Files Installed on the Windows
Workstation on page 4-5.