
SCSI Extender Installation and User's Guide


Installing a SCSI Extender
SCSI Extender Installation and User’s Guide—522347-002
3-2
Unpacking a SCSI Extender
Unpacking a SCSI Extender
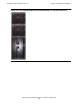
1. Place the shipping container on a flat, clean, stable surface.
2. Carefully remove the SCSI extender and verify the contents against the packing list
and ensure that all the parts specified below are enclosed:
•
SCSI Extender
•
Power cable
•
Mounting brackets (with 4 Phillips screws that are already screwed into the
side of the SCSI extender) for a SCSI Extender rack-mount installation
•
Five rubber feet (unused when installing in an enclosure or rack)
•
RS-232 cable (unused)
•
This guide
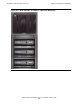
3. Remove the foam from the sides of the SCSI extender and remove it from the
plastic bag. Save the original shipping container and packing material in case
future reshipment is necessary.
4. Visually inspect the SCSI extender and notify your freight carrier immediately of
any damage.
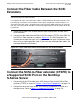
5. Record the Media Access Control (MAC) address located on the label of the SCSI
extender box and keep with other original documents.
Installing Mounting Brackets in a Customer-
Provided Rack
Depending on the type of rack, additional hardware might be needed.
1. Remove the 4 Phillips screws from the SCSI extender.
2. Insert one mounting bracket flush against the left side and fasten it with two Phillips
screws.
3. Insert the second mounting bracket flush against the right side and fasten it with
the other two Phillips screws.