
ServerNet Cluster 6770 Hardware Installation and Support Guide


Installing a ServerNet Cluster Switch Enclosure
ServerNet Cluster 6770 Hardware Installation and Support Guide—522544-002
4-3
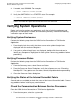
Task 3: Completing the Installation
Task 3: Completing the Installation
1. Connect the ServerNet II Switch to the nodes as described in Section 6,
Connecting the ServerNet Fiber-Optic Cables.
2. Push the ServerNet II Switch into the enclosure.
3. Replace the blank panels above the ServerNet II Switch.
4. Power on the cluster switch as described in Powering On a ServerNet Cluster
Switch on page 7-2.
5. If you are adding a door to the service-side of the enclosure, refer to the NonStop
S-series Half-Height Service-Side Door Read Me.
6. Repeat all steps for the other ServerNet Cluster Switch enclosures.
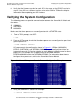
Configuring the ServerNet Cluster
1. Perform all the steps required to prepare a node to be added to a ServerNet cluster
as described in the ServerNet Cluster Manual.
2. Complete the configuration of the ServerNet cluster:
a. Use the guided procedure for configuring a ServerNet node. If you are using
OSM, this procedure is launched by the Add Node to ServerNet Cluster action
of the System resource. You connect the fiber-optic ServerNet cables to the
MSEBs during this procedure.
b. Use the guided procedure for adding a switch if you have more than one switch
per fabric. You connect the fiber-optic ServerNet cables between the switches
on the same fabric during this procedure.
Note. For each node, you must connect to the same port number on the Yn switch as you
did on the Xn switch.