
ServerNet Cluster 6770 Hardware Installation and Support Guide

Installing Switch Components in an EIA Standard
Rack
ServerNet Cluster 6770 Hardware Installation and Support Guide—522544-002
5-8
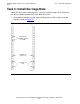
Task 5: Install the UPS
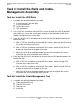
4. Mount the assembled ServerNet II Switch slide rails into the inside of the rack:
a. Orient the slide rails so that the metal stop tab at one end of the rails is to the
back of the rack.
b. Align the slide rails at the level of the bottom hole of the cable-management
assembly bracket that you installed in step 3 of task 4c.
c. Attach each slide bracket to the rack using one M5 screw.
d. Ensure that all ends are mounted at the same level.
5. Tighten all the screws associated with the slide rails.
Task 5: Install the UPS
For safety reasons, the UPS cannot be installed or replaced by customers. The UPS
FRU must be installed into the rack by a service provider before you can install the
ServerNet II Switch and the AC transfer switch. Your service provider can find the
procedure for installing the UPS in the NonStop S-series Service Provider Supplement.
Task 6: Install the AC Transfer Switch
1. From the front of the rack, place the AC transfer switch above the UPS.
2. With a T25 Torx screwdriver, attach the AC transfer switch to the rack frame using
four M5 Torx screws.
Task 7: Install the ServerNet II Switch Into the
Rack
1. Label the ServerNet II Switch either Xn or Yn according to its ServerNet fabric and
configuration. See ServerNet II Switch Configuration
on page 2-7 for more
information.
2. If there is a voltage setting on the AC/DC power supply located in the back of the
ServerNet II Switch, make sure that the voltage is set correctly. Set the
international version of the ServerNet Cluster Switch at 230 volts; set the Japanese
and North American ServerNet Cluster Switch at 115 volts.
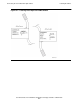
3. Hold the switch with both hands:
a. Slip the wheels on the right side of the ServerNet II Switch partially (about 1
inch) into its matching slide rail.
b. Slip the wheels on the left side of the ServerNet II Switch into its matching slide
rail.
Make sure that all the wheels slide into the slide rail properly.