
ServerNet Cluster 6780 Operations Guide (G06.24+, H06.03+)


Troubleshooting and Replacement Procedures
ServerNet Cluster 6780 Operations Guide—525606-002
3-33
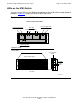
Replacing a CRU in a 6780 Switch
Replacing a CRU in a 6780 Switch
You also use the guided procedure to replace a Switch Logic Board or a Switch PIC in
slots 6 through 9. The remaining CRUs in a 6780 switch require a manual procedure.
Replacing a Switch Logic Board (Slot 14)
To replace a 6780 switch logic board using the OSM guided procedure:
1. In the tree pane, navigate to the switch logic board you need to replace and right-
click.
2. Select Actions. The Actions dialog box appears.
3. From the Actions list, select Replace.
4. Click Perform action.
Online help is available to assist you in performing the procedure.
Replacing a Node PIC (Slots 6 Through 9)
To replace a switch PIC in slots 6 through 9 using the OSM guided procedure:
1. In the tree pane, navigate to the switch PIC you need to replace and right-click.
(The last digit of the PIC name should be between 6 and 9.)
2. Select Actions. The Actions dialog box appears.
3. From the Actions list, select Replace.
4. Click Perform action.
Online help is available to assist you in performing the procedure.
Replacing a Layer PIC (Slots 11, 12, and 13)
The PICs is slots 11, 12, and 13 are used for connections to another switch layer. To
replace a PIC in slot 11, 12, or 13:
1. Use OSM or SCF to check the health of the corresponding PIC on the other fabric.
If there are any problems on the corresponding PIC, resolve them before
continuing.
2. Check that the cables connected to the PIC are properly labeled.
3. Disconnect the cables connected to the PIC and remove the PIC
4. Install a replacement PIC in the same slot and be sure it is fully seated.
5. Wait for power LED to light. Be sure the fault LED does not light.
6. Reconnect the cables to the PIC. Confirm that the link-alive LED lights.