HP NonStop SQL/MX Quick Start Abstract Providing the basic techniques for using HP NonStop™ SQL/MX, this Quick Start is designed to enable you to get immediate access to your database without extensive preparation. Product Version NonStop SQL/MX Release 2.0 Supported Release Version Updates (RVUs) This publication supports G06.23 and all subsequent G-series RVUs until otherwise indicated by its replacement publication.
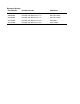
Document History Part Number Product Version Published 424297-001 NonStop SQL/MX Release 1.0 March 2001 429989-001 NonStop SQL/MX Release 1.5 November 2001 523399-001 NonStop SQL/MX Release 1.8 November 2002 523724-001 NonStop SQL/MX Release 2.0 April 2004 523724-002 NonStop SQL/MX Release 2.
HP NonStop SQL/MX Quick Start Index What’s New in This Manual v Manual Information v New and Changed Information v About This Manual vii Audience vii Related Documentation vii Notation Conventions x 1.
3. Stating Conditions for Selecting Data Contents Selecting Distinct Rows 2-5 Displaying Information in an Ordered Sequence 2-6 3. Stating Conditions for Selecting Data Using Predicates to Select Data 3-1 Using the LIKE Predicate 3-2 Specifying More Than One Condition 3-3 Using AND or OR 3-3 Specifying What Not to Select 3-4 4.
9. Creating Database Objects Contents 9.
Contents HP NonStop SQL/MX Quick Start—523724-002 iv
What’s New in This Manual Manual Information HP NonStop SQL/MX Quick Start Abstract Providing the basic techniques for using HP NonStop™ SQL/MX, this Quick Start is designed to enable you to get immediate access to your database without extensive preparation. Product Version NonStop SQL/MX Release 2.0 Supported Release Version Updates (RVUs) This publication supports G06.23 and all subsequent G-series RVUs until otherwise indicated by its replacement publication.
New and Changed Information What’s New in This Manual HP NonStop SQL/MX Quick Start—523724-002 vi
About This Manual This Quick Start is designed to help you learn some basic techniques for using SQL/MX and to allow you to get immediate access to your database without extensive preparation. Audience The Quick Start is useful if: • • • You plan to be a user of MXCI (SQL/MX conversational interface). You want a quick introduction to using SQL. You want to use MXCI to retrieve information from your database or to add or modify data.
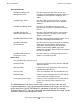
Related Documentation About This Manual Specialized Guides SQL/MX Installation and Management Guide Describes how to plan for, install, create, and manage an SQL/MX database. Explains how to use installation and management commands and utilities. SQL/MX Query Guide Describes how to understand query execution plans and write optimal queries for an SQL/MX database. SQL/MX Data Mining Guide Describes the SQL/MX data structures and operations to carry out the knowledge-discovery process.
Related Documentation About This Manual The following manuals are part of the SQL/MP library of manuals and are essential references for information about SQL/MP Data Definition Language (DDL) and SQL/MP installation and management: Related SQL/MP Manuals SQL/MP Reference Manual Describes the SQL/MP language elements, expressions, predicates, functions, and statements. SQL/MP Installation and Management Guide Describes how to plan, install, create, and manage an SQL/MP database.
Notation Conventions About This Manual This figure shows the manuals in the SQL/MX library: Programming Manuals Introductory Guides SQL/MX Comparison Guide for SQL/MP Users SQL/MX Programming Manual for C and COBOL SQL/MX Quick Start SQL/MX Programming Manual for Java Reference Manuals SQL/MX Reference Manual SQL/MX Messages Manual SQL/MX Connectivity Service Administrative Command Reference SQL/MX Glossary DataLoader/MX Reference Manual Specialized Guides SQL/MX Installation and Management G
General Syntax Notation About This Manual This requirement is described under Backup DAM Volumes and Physical Disk Drives on page 3-2. General Syntax Notation This list summarizes the notation conventions for syntax presentation in this manual. UPPERCASE LETTERS. Uppercase letters indicate keywords and reserved words. Type these items exactly as shown. Items not enclosed in brackets are required. For example: MAXATTACH lowercase italic letters.
General Syntax Notation About This Manual braces on each side of the list, or horizontally, enclosed in a pair of braces and separated by vertical lines. For example: LISTOPENS PROCESS { $appl-mgr-name } { $process-name } ALLOWSU { ON | OFF } | Vertical Line. A vertical line separates alternatives in a horizontal list that is enclosed in brackets or braces. For example: INSPECT { OFF | ON | SAVEABEND } … Ellipsis.
1 Welcome to Quick Start This section provides information about how to use MXCI and how to install the sample database that is used in the Quick Start tutorial. What Is MXCI? MXCI is the conversational interface to the SQL/MX relational database management system. Use MXCI to perform data manipulation operations without any programming. Use SQL (the structured query language) within MXCI to display and modify information in your database.
Entering a Command Welcome to Quick Start Entering a Command To enter commands at the MXCI prompt (>>), you must indicate the end of an MXCI command by typing a semicolon (;). If you press Enter without typing a semicolon, MXCI displays the command continuation prompt (+>). You can either continue the command or type a semicolon and press Enter to execute the command: >>BEGIN WORK +>; --- SQL operation complete.
PARTS Table Welcome to Quick Start PARTS Table Part/Num -------212 244 255 2001 6500 6603 7102 7301 ... Part Description -----------------PC SILVER, 20 MB PC GOLD, 30 MB PC DIAMOND, 60 MB GRAPHIC PRINTER, M1 DISK CONTROLLER PRINTER CONTROLLER SMART MODEM, 1200 SMART MODEM, 2400 ... Price --------2500.00 3000.00 4000.00 1100.00 95.00 45.00 275.00 425.00 ... Qty/Avail ----------3525 4426 3321 2100 2532 430 2200 2332 ... ORDERS Table Order/Num --------100210 100250 110220 ...
EMPLOYEE Table Welcome to Quick Start EMPLOYEE Table Employee/Number --------------1 23 29 32 39 43 65 72 75 87 89 ... First Name ---------ROGER JERRY JANE THOMAS KLAUS PAUL RACHEL GLENN TIM ERIC PETER ... Last Name --------GREEN HOWARD RAYMOND RUDLOFF SAFFERT WINTER MCKAY THOMAS WALKER BROWN SMITH ... Dept/Num -------9000 1000 3000 2000 3200 3100 4000 3300 3000 4100 3300 ... Job/Code -------100 100 100 100 100 100 100 100 300 400 300 ... Salary --------175500.00 137000.10 136000.00 138000.40 75000.
Installing or Removing the Sample Database Welcome to Quick Start If OSS has been installed and the Manage OSS files option has been selected, DSM/SCM automatically extracts the setmxdb script from the pax file and installs it in the /usr/tandem/sqlmx/bin directory. If the files are not present in this directory, DSM/SCM might not be configured to extract the files automatically. In this case, you must extract the files manually: 1. At the TACL prompt, change to the $SYSTEM.
Installing or Removing the Sample Database Welcome to Quick Start The supported operations are: -iall Installs the SQL/MX, Data Mining, and Pub/Sub sample databases. This is the default operation. -imx Installs the SQL/MX sample database. -idm Installs the Data Mining sample database. -ips Installs the Pub/Sub sample database. -rall Removes all three sample databases. -rmx Removes the SQL/MX sample database. -rdm Removes the Data Mining sample database.
Installing or Removing the Sample Database Welcome to Quick Start -part Specifies additional or alternate volume names on which partitioned tables in the sample database are to be created. Only one table in the SQL/MX sample database, the PARTLOC table, may be partitioned. If the -part option is specified, then the PARTLOC table is created with two partitions, using the volumes designated via this option. If the -part option is not specified, then a nonpartitioned PARTLOC table is created.
Using a SQL/MX Release 1.8 setmxdb Script in the SQL/MX Release 2.0 Environment Welcome to Quick Start Extra help options: • -v Prints the version and date of the script. -mult Prints advice on creating multiple sample databases. If you use the -v option, setmxdb displays a message with its version and date: Version 2.
Welcome to Quick Start • ° Using a SQL/MX Release 1.8 setmxdb Script in the SQL/MX Release 2.0 Environment Use the -catalog option when running the SQL/MX Release 2.0 setmxdb. Before running the SQL/MX Release 1.8 setmxdb in a SQL/MX Release 2.0 environment, you must create the catalog and schemas required by the script. (The default schemas are PERSNL, SALES, and INVENT.) Otherwise, the script will generate an error.
Welcome to Quick Start Using a SQL/MX Release 1.8 setmxdb Script in the SQL/MX Release 2.
2 Selecting Information From a Table This section provides information about how to select specific rows and columns and how to use the INVOKE command. Working With SQL/MP Tables SQL/MX supports DML operations on SQL/MP tables as well as SQL/MX tables. At the beginning of each new MXCI session, specify if you will use three-part logical names or Guardian physical file names to refer to SQL/MP tables. (You must use logical names to refer to SQL/MX tables.
Displaying Selected Columns. Selecting Information From a Table Tip • • • Using SELECT * is a short way of specifying all the columns in a table. The result of SET SCHEMA stays in effect until the end of your session or until you execute another SET SCHEMA. The FROM clause is always required in the SELECT statement. Displaying Selected Columns. You can display a specific set of columns and rows of data by providing additional information in the SELECT statement.
Displaying Calculated Values Selecting Information From a Table 6603 PRINTER CONTROLLER 430 --- 2 row(s) selected.Example Display the parts where part description is ”PRINTER CONTROLLER”: SELECT PARTNUM, QTY_AVAILABLE FROM PARTS WHERE PARTDESC = 'PRINTER CONTROLLER'; The selected row is: Part/Num -------6603 Qty/Avail ----------430 --- 1 row(s) selected. Tip • To continue a long statement or command on the next line, press Enter.
Displaying Descriptions of Columns Selecting Information From a Table Example Using the data in the ODETAIL table, calculate the total price for the number of units of each part in an order. Select parts from order number 100210: SELECT ORDERNUM, PARTNUM, QTY_ORDERED*UNIT_PRICE FROM ODETAIL WHERE ORDERNUM = 100210; The selected rows are: Order/Num ---------100210 100210 100210 100210 Part/Num -------244 2001 2403 5100 (EXPR) --------------------10500.00 3300.00 3720.00 1500.00 --- 4 row(s) selected.
Selecting Information From a Table Selecting Distinct Rows Example Display the column definitions of the PARTS table: INVOKE PARTS; The displayed column definitions are: -- Definition of table SAMDBCAT.SALES.
Selecting Information From a Table Displaying Information in an Ordered Sequence Example Determine which sales representatives have orders in the ORDERS table and display each identification number only once: SELECT DISTINCT SALESREP FROM ORDERS; The selected rows are: SALESREP -------220 221 222 223 226 227 229 231 568 --- 9 row(s) selected. Displaying Information in an Ordered Sequence To display the selected rows in a sorted order, include the ORDER BY clause in the SELECT statement.
Displaying Information in an Ordered Sequence Selecting Information From a Table Example Display customer numbers, order numbers, and delivery dates arranged in ascending order by customer number. Select only orders of sales representatives identified by numbers less than 300: SELECT CUSTNUM, ORDERNUM, DELIV_DATE FROM ORDERS WHERE SALESREP < 300 ORDER BY CUSTNUM; Some selected rows are: Cust/Num ORDERNUM ------- ---------30 200378 111 200562 131 300756 156 700694 ... ...
Selecting Information From a Table Displaying Information in an Ordered Sequence HP NonStop SQL/MX Quick Start—523724-002 2 -8
3 Stating Conditions for Selecting Data This section provides information about how to use predicates in a WHERE clause. Using Predicates to Select Data In some of the previous examples, one value is compared to another value by using a comparison operator: for example, the equal sign (=). A comparison operator is one type of SQL predicate.
Stating Conditions for Selecting Data Using the LIKE Predicate Using the LIKE Predicate Sometimes you want to select data that you are not able to specify completely. For example, suppose you want to know something about a particular printer, but you cannot remember the exact description of the printer.
Specifying More Than One Condition Stating Conditions for Selecting Data Specifying More Than One Condition You can use the logical operators AND and OR to connect two conditions. Notice that the AND operator is more restrictive because both conditions must be true. The OR operator requires that only one condition be true. Operator Example Meaning AND PARTDESC LIKE '%PRINTER%' AND PRICE < 500 If values in a row satisfy both of the conditions, the row appears in the result.
Specifying What Not to Select Stating Conditions for Selecting Data The selected rows are: PARTNUM ------2001 2002 2003 3103 PARTDESC -----------------GRAPHIC PRINTER,M1 GRAPHIC PRINTER,M2 GRAPHIC PRINTER,M3 LASER PRINTER, X1 PRICE -----------1100.00 1500.00 2000.00 4200.00 --- 4 row(s) selected. Tip You can combine any number of conditions with AND and OR to express conditions. The sequence of evaluation is AND before OR unless you specify otherwise by using parentheses.
Stating Conditions for Selecting Data Specifying What Not to Select Rows with part numbers between 3000 and 5999 and the row with part number 2001 are not selected. In this example, AND is part of the BETWEEN predicate. It does not connect two search conditions. • You can specify NOT BETWEEN, NOT IN, and NOT LIKE, but you cannot specify NOT with a comparison operator. For example, you must use <> to indicate not equal.
Stating Conditions for Selecting Data HP NonStop SQL/MX Quick Start—523724-002 3 -6 Specifying What Not to Select
4 Displaying Information About Groups of Rows This section provides information about aggregate functions and how to group rows. Selecting Values by Using Aggregate Functions In addition to displaying information from each row that satisfies conditions in a WHERE clause, you can combine a group of rows that have like values in the same column by using an aggregate function and displaying one row of information about the group.
Displaying Information About Groups of Rows Grouping and Ordering Rows Grouping and Ordering Rows Sometimes you want to display information about ordered groups of rows. For example, you might want to display group information ordered by the result of an aggregate function. Example Determine the earliest delivery date of all orders from the same customer.
Grouping and Ordering Rows Displaying Information About Groups of Rows Example Find the earliest delivery date for the complete set of customers. If you do not specify a GROUP BY clause, all rows belong to the same group (the entire table). In this case, you must also omit CUSTNUM from the select list because there is no single customer for the entire table: SELECT MIN(DELIV_DATE) FROM ORDERS; The selected value is: (EXPR) ----------2003-01-10 --- 1 row(s) selected.
Displaying Information About Groups of Rows Counting Rows Counting Rows Use the COUNT(*) function to count the rows in a group. Use the COUNT function with a selected column to count the values of that column in a group. Example Count the number of orders for each sales representative. Use COUNT(*) to specify that you want to count the number of rows in each group: SELECT SALESREP, COUNT(*) FROM ORDERS GROUP BY SALESREP ORDER BY SALESREP; Some of the selected rows are: Sales/Rep --------220 ... 226 ...
Displaying Information About Groups of Rows Computing Averages for Groups Tip The keyword DISTINCT causes each unique customer number for a particular sales representative to be counted only once. Sales representative 226 has three orders, but two of the orders are from the same customer. Computing Averages for Groups For some queries, you might want to get information about one or two specific groups. The next example uses the ODETAIL table to illustrate this technique.
Displaying Information About Groups of Rows Computing Averages for Groups HP NonStop SQL/MX Quick Start—523724-002 4 -6
5 Selecting Data From More Than One Table This section provides information about how to join tables and use correlation names. Joining Tables Some queries require information from more than one table. You can select data from two or more tables by effectively joining the tables. For example, the PARTS and ODETAIL tables contain related data. Each table has a PARTNUM column.
Qualifying Ambiguous Column Names Selecting Data From More Than One Table Qualifying Ambiguous Column Names Because the PARTNUM column has the same name in both the PARTS and ODETAIL tables, always qualify PARTNUM with a table name or a correlation name. For example, PARTS.PARTNUM uses the table name. Example Compare the quantity available of part number 5100 with the quantity ordered.
Using Correlation Names Selecting Data From More Than One Table Using Correlation Names You can define explicit correlation names for the PARTS and ODETAIL tables. For example, use the letter P for PARTS and the letter O for ODETAIL. Using correlation names shortens the length of the text you type. Example Compute the sum of the quantity ordered for each part number in the PARTS table. Group by the columns in the PARTS table: SELECT P.
Selecting Data From More Than One Table HP NonStop SQL/MX Quick Start—523724-002 5 -4 Using Correlation Names
6 Changing Information in a Table This section provides information about how to insert, update, and delete table rows. Inserting a Row Into a Table To insert rows in a table, use the INSERT statement. Example In the PARTS table, insert a row that describes a data modem with part number 9999: INSERT INTO PARTS (PARTNUM, PARTDESC, PRICE) VALUES (9999, 'DATA MODEM', 200.00); --- 1 row(s) inserted. Tip The definition of the PARTS table specifies a default value of zero for the QTY_AVAILABLE column.
Changing Information in a Table Updating an Existing Row Updating an Existing Row To change values in one or more columns and one or more rows, use the UPDATE statement. Example In the PARTS table, you have inserted a row that describes a data modem with part number 9999. Suppose you determine that the quantity available of part number 9999 is 12 units.
Deleting Rows From a Table Changing Information in a Table Deleting Rows From a Table The DELETE statement deletes entire rows from a table. Example Delete the two rows that you inserted in the previous examples. First, display the rows with part numbers 9998 and 9999: SELECT * FROM PARTS WHERE PARTNUM IN (9998, 9999); Part/Num -------9998 9999 Part/Desc -----------------300 BD DATA MODEM 1200 BD DATA MODEM Price -----------120.00 200.00 Qty/Avail ----------3 12 --- 2 row(s) selected.
Changing Information in a Table HP NonStop SQL/MX Quick Start—523724-002 6 -4 Deleting Rows From a Table
7 Using the Same SELECT Statement Repeatedly This section provides information about how to prepare and execute statements and use parameter values. Preparing to Execute a Statement Repeatedly You can prepare a statement (assigning a name to it) and execute it repeatedly during your MXCI session. When you end your session, however, the prepared statement is no longer available. Prepared statements are most useful if they contain parameters. A parameter is a name preceded by a question mark.
Providing the Parameter Values Using the Same SELECT Statement Repeatedly Providing the Parameter Values You have prepared the statement CKO for execution. The parameters are ?order and ?part. You must provide the values for the parameters before execution.
8 Protecting Database Integrity This section provides information about how to begin and end a transaction. Starting a Transaction SQL/MX enables you to define the beginning of a transaction. A transaction can consist of multiple SQL statements. You must end your transaction either by rolling back or by committing the changes you have made. Example Define the beginning of a transaction: BEGIN WORK; --- SQL operation complete. Example Enter the statements that perform the transaction.
Ending a Transaction Protecting Database Integrity Ending a Transaction If a problem occurs during the transaction, you can roll back, or undo, the transaction to cancel the changes you have made up to that point. If no problems occur, you can commit the changes to the database. Example Suppose you realize that you did not want prices between $1000 and $2000 doubled.
9 Creating Database Objects This section provides information about how to create and drop objects in your database. Database objects are created by issuing the Data Definition Language (DDL) statements of SQL/MX. For more information on DDL statements, see the SQL/MX Reference Manual. Starting MXCI You can create database objects by using MXCI, the SQL/MX conversational interface. MXCI runs as an OSS process and must be started from within the OSS environment. 1.
Creating a Table Creating Database Objects Creating a Table The minimum amount of information you must supply when creating a table includes: • • • A table name The name and data type of each column The name of the catalog and schema that will contain the table definition Example Suppose you want to create a table to organize attendees of a conference into teams. The table contains four columns.
Creating a View Creating Database Objects Creating a View A view provides an alternate way of looking at data in one or more tables. A view does not store the data separately but retrieves it from the underlying tables. You must have SELECT privileges on the underlying tables Create a view and then select data from the view by using a SELECT statement: Example Suppose you often want to know the names of department managers. You can create a view that includes this information.
Dropping Objects Creating Database Objects Dropping Objects You might want to delete the objects you have created. Example To delete the view, at the MXCI prompt, enter: DROP VIEW MYCAT.MYSCH.MYVIEW; Example To delete the table, at the MXCI prompt, enter: DROP TABLE MYCAT.MYSCH.MYTABLE; Example To delete the schema, at the MXCI prompt, enter: DROP SCHEMA MYCAT.
Index A E Ambiguous table names correlation name 5-2 table name 5-2 AND operator 3-3 Arithmetic operators 2-4 AS clause 2-4 Audited tables 8-2 AVG function 4-5 EMPLOYEE table 1-2 EMPNUM 9-2 Ending a transaction 8-2 Enter key 2-3 EXECUTE statement 7-2 B G BEGIN WORK statement 8-1 BETWEEN predicate 3-1, 3-5 GROUP BY clause 4-2 Groups of rows 4-1 C H Calculated values 2-3 Character data 2-5 Column definitions 2-5 COMMIT WORK statement 8-1, 8-2 Comparison operator 3-1 Computing averages 4-5 Correlatio
M Index M selected 2-2 MXCI entering command 1-2 starting session 1-1 stopping session 1-2 N NO DEFAULT 2-5 NOT NULL 2-5 NOT operator 3-1, 3-4 NULL predicate 3-1 Numeric data 2-5 O ODETAIL table 1-2 OR operator 3-3 ORDER BY 1 4-2 ORDER BY clause 2-6 Ordered groups of rows 4-2 ORDERS table 1-2 P Parameter names 7-2 parameter values 7-2 PARTS table 1-2 Predicates 3-1 PREPARE statement 7-1 Primary key 6-2 Q Qualifying table names 5-2 R ROLLBACK WORK statement 8-1, 8-2 Rows counting 4-4 S Sample datab
T Index SET list 6-2 SET PARAM command 7-1, 7-2 SET SCHEMA statement 2-2 setmxdb script 1-8 Single quotes 2-3 SQL 1-1 SQLCI 1-1 SQL/MP tables, working with 2-1 SQL/MX conversational interface (MXCI) 1-1 SQL/MX Release 1.
Special Characters Index HP NonStop SQL/MX Quick Start—523724-002 Index -4