
SQL/MX Report Writer Guide

Using MXCI and the Report Writer
HP NonStop SQL/MX Report Writer Guide—527194-002
2-8
Defining a Window for Report Output
Defining a Window for Report Output
If your report is wider than the maximum width of the device on which you are
displaying or printing it, the device determines at what point an output item will wrap to
the next line.
Use the SET LAYOUT WINDOW command to specify which vertical portion of the
report you want to see. For example, suppose that a report is designed for a printer
that prints 120 single-byte characters per line. The margins are set and the SELECT
command select list is specified as:
>> SET LAYOUT LEFT_MARGIN 8;
>> SET LAYOUT RIGHT_MARGIN 120;
>> SELECT DEPTNUM, DEPTNAME, MANAGER, LOCATION, EMPNUM,
+> FIRST_NAME, LAST_NAME, JOBCODE
.
.
+> ... ;
Use the SET LAYOUT WINDOW command to view different parts of the report. For
example, to make the EMPNUM column appear at the left edge of the output, enter
WINDOW EMPNUM, as shown in Figure 2-3.
You could produce the same result as Figure 2-3
by specifying SET LAYOUT
WINDOW TAB 60.
To use the TAB form of SET LAYOUT WINDOW:
•
Place your cursor at either the standard or the select-in-progress prompt.
•
Specify the print position relative to the full output line, including the margin.
The default first print position is always the same as position LEFT_MARGIN 0.
Therefore, if you set LEFT_MARGIN to 5, SET LAYOUT WINDOW TAB 5 moves
the character at the left margin to the left edge of the window.
Note that you cannot use the TAB form of SET LAYOUT WINDOW within an IF-THEN-
ELSE clause. In that case, the TAB setting is ignored, although an error is not
generated.
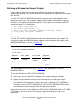
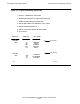
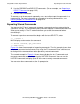
Figure 2-3. Defining a Window Using SET LAYOUT WINDOW
VST0206.vsd
S> SET LAYOUT WINDOW EMPNUM;
S> LIST FIRST 1;
EMPNUM FIRST_NAME LAST_NAME
JOBCODE
23 ROGER
GREEN 1000
S>