
SST Operations Bridge Administration Guide, Version 1.1
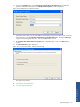
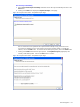
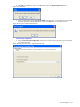

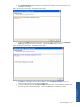
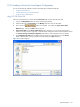
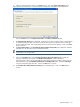
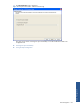
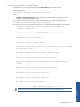
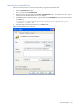
Table Of Contents
- SST Operations Bridge Administration Guide
- Preface
- Chapter 1: HP SST/OB: Overview
- Chapter 2: Getting Started
- Chapter 3: SST/OB Client Application
- Chapter 4: Application Options
- Chapter 5: User Profiles and Permissions
- Chapter 6: Policies
- Chapter 7: Global Parking and SLA Timers
- Chapter 8: Views
- Chapter 9: Dashboards
- Chapter 10: Terminal Sets
- Chapter 11: Faults and Fault Categories
- Chapter 12: Closure Codes
- Chapter 13: Object State Codes
- Chapter 14: Email Alerts
- Chapter 15: Thresholds and Threshold Alert
- Chapter 16: Commands
- Chapter 17: Terminal Trees
- Chapter 18: Action History
- Chapter 19: Data Management
- Chapter 20: Configuring Hours of Operation
- Appendix A: SST/OB Grid Features
- Appendix B: SST/OB Configuration Client Settings
- Appendix C: SST/OB Import Utility Configuration Parameters
- Document Feedback Form

Data Management 157
6. Select the configuration file and click on the Open button to return to the Import Custom Data wizard.
Figure 19-22 Import a Data Source – Choose a Data Source Page with Configuration File Path Specified
Click on the Next button on the Import Custom Data wizard Choose a Data Source page.
7. The Choose the key column page is displayed. Select the column which would be used as a mapping field
to update the destination table. The columns on the left are from the source file and columns on the right
are in the destination table. The corresponding columns must have the same data type. Click on the Next
button to continue.
8. The Import Custom Data wizard Customize the columns/data to be imported page is displayed. Select the
fields that are to be imported using the available check boxes.
NOTE: Select the Do not prompt for overwrite data check box in case you do not want SST/OB to
prompt before overwriting the data.
9. Click on the Properties button on the Customize the columns/data to be imported page to modify the
properties of the data to be imported. The Modify Column Properties window is displayed.
Specify the column name in the SST/OB database and the display name that would be visible in SST/OB
Client Application using the Destination Column Name and Display Name fields. Change the Data Type
using the corresponding drop-down box. Click on the OK button to continue.
10. The Customize the columns/data to be imported page is displayed again. Click on the Next button to
continue.