
SST Operations Bridge Administration Guide, Version 1.1
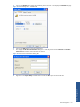
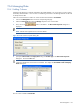

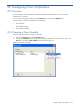
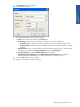
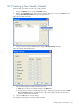
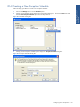

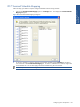
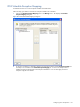
Table Of Contents
- SST Operations Bridge Administration Guide
- Preface
- Chapter 1: HP SST/OB: Overview
- Chapter 2: Getting Started
- Chapter 3: SST/OB Client Application
- Chapter 4: Application Options
- Chapter 5: User Profiles and Permissions
- Chapter 6: Policies
- Chapter 7: Global Parking and SLA Timers
- Chapter 8: Views
- Chapter 9: Dashboards
- Chapter 10: Terminal Sets
- Chapter 11: Faults and Fault Categories
- Chapter 12: Closure Codes
- Chapter 13: Object State Codes
- Chapter 14: Email Alerts
- Chapter 15: Thresholds and Threshold Alert
- Chapter 16: Commands
- Chapter 17: Terminal Trees
- Chapter 18: Action History
- Chapter 19: Data Management
- Chapter 20: Configuring Hours of Operation
- Appendix A: SST/OB Grid Features
- Appendix B: SST/OB Configuration Client Settings
- Appendix C: SST/OB Import Utility Configuration Parameters
- Document Feedback Form

Configuring Hours of Operation 168
Enter the following details in the Exception Schedule dialog box:
a. Name: Enter the name for the exception schedule in the Name field.
b. Type: Select the Type of exception schedule from the Type dropdown box. The options are
• Extended Hours in a Day: This exception type defines the extended hours during which a terminal is
expected to be open for business, while it is normally closed for those hours. Specify the extended
date and hours using Select Date, Start Hour and End Hour field.
• Break Hours in a Day: This exception type defines the start and end hours of a break during a day
when a terminal is not expected to be open for business. This exception can be used with any
schedule. The break hours can be defined for only one break in a day. The hours defined for
break hour exception should be between the hours specified in the normal working schedules for
the concerned terminal. Specify the starting date/time and end date/time for the exception
schedule using the From/Start Hour and To/End Hour drop down lists
• Holiday: The holiday exception type defines the date when the terminal is not expected to be open
for the business. This exception type can be used with any schedule.
4. Click on the OK button to save the changes.
This completes the procedure for creating an exception schedule.
20-5 Modifying Schedule Settings
Follow the steps given below to modify the schedule settings:
1. Click on the Schedules option in the Manage menu.
2. The Schedules dialog box is displayed. Select the schedule you wish to modify from the Schedules list and
click on the Properties button.
3. This displays the corresponding schedule dialog box. Make the changes in the corresponding fields and
click on the OK button.
This completes the procedure for changing the settings for a configured Schedule.
20-6 Deleting a Schedule
Follow the steps given below to delete a schedule:
1. Click on the Schedules option in the Manage menu.
2. The Schedules dialog box is displayed. Select the schedule you wish to delete from the Schedules list and
click on the Delete button.
3. The Delete Schedules confirmation box is displayed.
Figure 20-7 Delete Schedule Confirmation Box
Click on the Yes button to delete the selected Schedule.
This completes the procedure for deleting a Schedule.