HP SST Operations Bridge Installation Guide Part number: 544638-002 Second edition: 07/2009
Legal notices Hewlett-Packard makes no warranty of any kind with regard to this manual, including, but not limited to, the implied warranties of merchantability and fitness for a particular purpose. Hewlett-Packard shall not be held liable for errors contained herein or direct, indirect, special, incidental or consequential damages in connection with the furnishing, performance, or use of this material.
Contents Preface Before You Begin ..................................................................................................................................... 4 Who Should Read This Guide ................................................................................................................... 4 Goals of Documentation ........................................................................................................................... 4 Organization ..................................
Preface HP SST Operations Bridge (SST/OB) is specially designed to provide an across-the-board solution for managing Problem, Change and Asset management in your Terminal environment. This manual introduces you with the SST/OB components and provides information on how to install SST/OB Operations Bridge on the Windows environment.
HP SST Operations Bridge Documentation Manual Description Media SST Operations Bridge Concepts Guide Provides information on the SST/OB product, the features/benefits the software offers along with its architecture and data-flow. PDF SST Operations Bridge Installation Guide Provides information on how to install the various components of SST/OB.
1 Installing SST/OB on Windows This chapter lists the steps involved in installing the SST/OB in the Windows environment. 1-1 Installation Overview Installing SST/OB includes installation of the following components: SST/OB on the NonStop Server This includes installing the SST/OB components on the HP NonStop Server. Refer to the HP NonStop SST Agent Installation Guide for details on how to install the HP NonStop SST Agent on the NonStop environment.
1-2-4 For SST/OB Client • Windows XP, 2003 or Higher • Memory – 1 GB (Minimum), (Recommended 2 GB or above) • Disk Space – 10 GB or Above • Database access to the SST/OB database • SST/OB Database and Application Server should be installed on any system on the network • SQL Server port number if the default port is not to be used • Microsoft framework 2.0 should be installed. .
1-3 Prerequisites Before installing SST/OB, ensure that the following tasks have been accomplished: 1. The user installing SST/OB Server, Web Server and Reports must have Administrator rights/privileges on the system. 2. Before starting the installation, it is recommended that you exit from any other Windows programs that are running. 3.
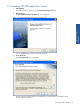
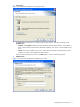
1-4 Installing SST/OB Application Server 1. Getting Started To start the installation, double-click on the SSTOperationsBridge_Server.exe. 2. Welcome Screen The SST Operations Bridge Server Welcome screen is displayed. Installing SST/OB on Windows Figure 1-1 SST Operations Bridge Server Setup Welcome Screen Click on the Next button to continue with the setup program. 3. License Agreement The License Agreement screen is displayed.
4. Type of Setup Figure 1-3 SST Operations Bridge Server Setup Type Screen The Setup Type screen prompts you to select the type of setup required. Most users commonly use the Complete option. • Complete: The Complete installation provides complete functionality of the software. If you select this option, all the SST/OB components are selected for installation. This option is recommended for most users.
The Database Server screen is displayed. Select the Database Server where the SST/OB Database is to be created or exists using the Database Server field. You can also browse for the Database Server using the Browse button. The default port used by the SQL Server is 1433. In case the SQL Server is listening on a port other than the default port, specify the information in the , format.
7. Select Options – ATM/TA Figure 1-6 SST Operations Bridge Server Select Option Screen The Select Option screen is displayed again. Use this screen to integrate SST/OB with ATM/TA. To integrate SST/OB with ATM/TA, select the ATM Transaction Analyzer integration check box. This will poll the ATM/TA database for latest statistics and maintain them in the SST/OB database. 8.
9. Confirm Entries & Copy Files Installing SST/OB on Windows Figure 1-8 SST Operations Bridge Server Check Setup Information Screen The next screen, Check Setup Information, displays the current settings, which have been selected so far. In case you want to change any of the settings, you can do so by going back to the particular screen before you start copying the program files. NOTE: You should check the location of the directory where SST/OB is to be installed.
11. Elink Configuration – Port Configuration Figure 1-10 SST Operations Bridge Server Elink Configuration Screen In the next Elink Configuration screen, enter the SST Operations Bridge Port and the Base24 Event Port. Click on the Next button to continue. 12. Adding More HP NonSop Servers Figure 1-11 Question Box On clicking Next, a Question confirmation box is displayed. Click on the Yes button to add more HP NonStop System configurations, or else, click on the No button. 13.
14. Setup Complete The SST Operations Bridge Server Setup Completed screen denotes the completion of the setup process. The Open SST/OB Configuration Client check box is selected by default. The SST/OB Configuration Client allows you to edit the SST/OB configuration settings. Click on the Finish button to complete the installation. 15. SST/OB Configuration Client The SST/OB Configuration Client screen is displayed if the Open SST/OB Configuration Client check box is selected in the Setup Complete screen.
The SST/OB Configuration Client message box is displayed. Figure 1-15 SST/OB Configuration Client Message Box Click on the OK button. This completes the SST/OB Application Server Setup process.
1-5 Installing SST/OB Client Follow the steps to install the SST/OB Client on Windows environment. There is an added facility to distribute the SST/OB Client installation package in an organization where the SST/OB client application has to be installed on numerous machines. The preferred method is to go with Windows Authentication for connecting to the SSTOB database.
Table 1-1 SST/OB Custom Setup Configuration Client Components Categories Parameter Initial Catalog (SSTOB) User ID Specify the SQL User Name Password Specify the SQL Password Windows Authentication 0 - For selecting SQL authentication 1 - For selecting Windows authentication NOTE: The Initial Catalog values for ATM/TA Data Source and SST/OB Data Source should not be changed. NOTE: You need to specify User name and Password only when you select SQL authentication. 1.
3. License Agreement The License Agreement screen is displayed. Installing SST/OB on Windows Figure 1-19 SST Operations Bridge Client Setup License Agreement Screen Read the agreement carefully and click on the Yes button to accept the terms and conditions and to continue with the setup process. 4. Choose Destination Location The Choose Destination Location screen is displayed.
5. Choose Option The SST Operations Bridge Client Choose Option Screen is displayed. Figure 1-21 SST Operations Bridge Client Choose Option Screen Select one of the following options to initialize the SST/OB Client installation: • Retrieve database connection information from file This option would allow the user to specify the folder location where databaseinfo.ini file exists. This is the file that was created using Configuration Client utility.
6. Database Server The Database Server screen is displayed. Select the Database Server where the SST/OB Database exists using the Database Server field. You can also browse for the Database Server using the Browse button. The default port used by the SQL Server is 1433. In case the SQL Server is listening on a port other than the default port, specify the information in the , format.
7. Integration Option Figure 1-23 SST Operations Bridge Server Setup Integration Option Screen The Integration Option screen is displayed. Use this screen to integrate SST/OB with ATM/TA. To integrate SST/OB with ATM/TA, check the ATM Transaction Analyzer integration check box. 8. Database Server – ATM/TA Integration Figure 1-24 SST Operations Bridge Server Database Server Screen The Database Server screen is displayed.
9. Confirm Entries & Copy Files The next screen, Check Setup Information, displays the current settings, which have been selected so far. In case you want to change any of the settings, you can do so by going back to the particular screen before you start copying the program files. NOTE: You should check the location of the directory where SST/OB is to be installed. In case the location has to be changed after installation, you will have to reinstall the software.
11. Check Connectivity with User DSN Figure 1-27 SST Operations Bridge Client Information Box The SST Operations Bridge Client message box is displayed. Ensure that the SSTOB_Client User DSN has been created and the connectivity has been tested. Click on the OK button to complete the SST/OB Client installation.
1-6 Installing SST/OB Web Server 1. Starting Up Double-click on the SSTOperationsBridge_WebServer.exe to start the installation process. Install Shield prepares the Setup program for use and the SST Operations Bridge Web Server message box is displayed. Before installing SST/OB Web Server make sure that the SST/OB Database and SST/OB Application Server are installed on the network.
4. License Agreement The License Agreement screen is displayed. Figure 1-31 SST Operations Bridge Web Server Setup License Agreement Screen Review the Software license agreement and click on the Yes button to continue with the installation. 5. Destination Location Figure 1-32 SST Operations Bridge Web Server Setup Choose Destination Location Screen The Choose Destination Location screen shows the path of the folder where SST/OB Web Server files will be installed by default.
6. Database Server The Database Server screen is displayed. Select the Database Server where the SST/OB Database exists using the Database Server field. You can also browse for the Database Server using the Browse button. The default port used by the SQL Server is 1433. In case the SQL Server is listening on a port other than the default port, specify the information in the , format.
8. Database Server – ATM/TA Integration Figure 1-35 SST Operations Bridge Web Server Database Server Screen The Database Server screen is displayed. Select the Database Server where the ATM/TA Database exists using the Database Server field. You can also browse for the Database Server using the Browse button. The default port used by the SQL Server is 1433. In case the SQL Server is listening on a port other than the default port, specify the information in the , format.
10. Confirm Entries & Copy Files Installing SST/OB on Windows Figure 1-37 SST Operations Bridge Web Server Setup Check Setup Information Screen The next screen, Check Setup Information, displays the current settings, which have been selected so far. In case you want to change any of the settings, you can do so by going back to the particular screen before you start copying the program files. NOTE: You should check the location of the directory where SST/OB is to be installed.
12. Setup Completed Figure 1-40 SST Operations Bridge Web Server Setup Completed Screen The SST Operations Bridge Web Server Setup Completed screen denotes the completion of the setup process. Click on the Finish button to complete the Setup process. 13. Rebooting the System Figure 1-41 SST Operations Bridge Web Server Message Box It is recommended to reboot the system for proper functioning. The SST Operations Bridge Web Server Message Box is displayed.
1-7 Installing SST Reports on Window Step A: Starting Up Double-click on the SST Reports.exe to start the installation process. Install Shield prepares the Setup program for use and the SSTReports Setup Welcome screen is displayed. Installing SST/OB on Windows Figure 1-42 SSTReports Setup Welcome Screen Click on the Next button to continue with the Setup. Step B: License Agreement The License Agreement screen is displayed.
Step C: Destination Location Figure 1-44 SSTReports Setup Choose Destination Location Screen The Choose Destination Location screen shows the path of the folder where SSTReports files will be installed by default. Use the Browse button to specify a directory other than the default. To move on with the installation process, click on the Next button. Step D: Database Server Figure 1-45 SSTReports Setup Database Server Screen The Database Server screen is displayed.
Step E: Setup Type The Setup Type screen is displayed. Select the checkbox to integrate SSTReports with ATM Transaction Analyzer (ATM/TA) for integrating with ATM/TA. Click on the Next button to continue. Step F: Database Server Figure 1-47 SSTReports Setup Database Server Screen The Database Server screen is displayed. For ATM/TA integration, select the Database Server where the ATMTA database exists using the Database Server field. You can also browse for the Database Server using the Browse button.
Step G: Confirm Entries and Copy Files Figure 1-48 SSTReports Check Setup Information Screen The next screen, Check Setup Information, displays the current settings, which have been selected so far. This will depend on the Database Connection and the SQL Authentication Type. In case you want to change any of the settings, you can do so by going back to the particular screen before you start copying the program files. NOTE: You should check the location of the directory where SSTReports is to be installed.
Step I: Setup Completed The SSTReports Setup Completed screen denotes the completion of the Setup process. Click on the Finish button to complete the Setup process. NOTE: Network service/ASPNET user must have permissions on the SSTReports folder to upload the XML reports. The location of SSTReports folder is 'Drive:\Inetpub\wwwroot\SSTReports'. NOTE: To integrate SST Reports website in the SSTOB Web client, specify the value for "ReportsWebServerURL" parameter in SSTOB Web.config file. The location of Web.
1-8 Upgrading SST/OB to Version 1.7.1 This section explains the procedure to upgrade from a previous version of SST/OB to version1.7.1. 1. Stop the SST/OB Services using the Start->Programs-> HP SST->SST OB->Server->Service Manager->Stop All option. 2. Take a backup of the SST/OB database on the SQL Server. 3. To upgrade the SST/OB Database, run the SSTOBUpgrade1_7to1_7_1.sql database upgrade script using the SQL Analyzer. NOTE: SSTOBUpgrade1_7to1_7_1.sql database script will be applicable only for 1.
c. The SST Operations Bridge Server Setup Welcome screen is displayed with the information that the wizard will update the installed SST/OB Server version 1.7 to version 1.7.1. Installing SST/OB on Windows Figure 1-53 SST Operations Bridge Server Setup Welcome Screen Click on the Next button to continue. d. The SST Operations Bridge Server Database Server screen is displayed.
e. The Select Option screen is displayed again. Figure 1-55 SST Operations Bridge Server Select Option Screen Use this screen to integrate SST/OB with ATM/TA. To integrate SST/OB with ATM/TA, select the ATM Transaction Analyzer integration check box. f. The Database Server screen is displayed for integration with ATM/TA database.
g. The SST Operations Bridge Server Installation information box is displayed. Figure 1-57 SST Operations Bridge Server Installation Information Box The SST Operations Bridge Server Installation information box is displayed with the information to run SSTOB_DailySummarizationandArchivingJob.sql script to create job from C:\Program Files\HP SST\SST Operations Bridge\Database on Admin database server before proceeding. NOTE: Clicking on the OK button does NOT reboot the system.
b. The Database Server screen is displayed. Figure 1-59 SST Operations Bridge Client Database Server Screen Select the Database Server where the SST/OB Database exists using the Database Server field. You can also browse for the Database Server using the Browse button. The default port used by the SQL Server is 1433. In case the SQL Server is listening on a port other than the default port, specify the information in the , format.
d. The Database Server screen is displayed for integration with ATM/TA database. Specify SQL Server name where ‘ATMTA’ database exists for ATM Transaction Analyzer integration with SST/OB using the Database Server field. You can also browse for the Database Server using the Browse button. The default port used by the SQL Server is 1433. In case the SQL Server is listening on a port other than the default port, specify the information in the , format.
f. The SST Operations Bridge Client message box is displayed. Figure 1-63 SST Operations Bridge Client Message Box Ensure that the SSTOB_Client User DSN has been created and the connectivity has been tested. 6. The next step is to upgrade the SST Operations Bridge Web Server. a. Run the SST Operations Bridge Web server installation exe.
c. The Database Server screen is displayed. Select the Database Server where the SST/OB Database exists using the Database Server field. You can also browse for the Database Server using the Browse button. The default port used by the SQL Server is 1433. In case the SQL Server is listening on a port other than the default port, specify the information in the , format.
e. The Database Server screen is displayed for integration with ATM/TA database. Figure 1-68 SST Operations Bridge Web Server Database Server Screen Specify SQL Server name where ‘ATMTA’ database exists for ATM Transaction Analyzer integration with SST/OB using the Database Server field. You can also browse for the Database Server using the Browse button. The default port used by the SQL Server is 1433.
2 Uninstalling SST/OB This chapter provides instructions on how to uninstall various SST/OB components from the Windows environment. 2-1 Uninstalling SST Reports This chapter provides information on how to uninstall SST Reports. Follow the steps given below to uninstall the SST/OB Reports components from the workstation. NOTE: Before beginning the uninstallation, ensure that none of the SST/OB Web Server components are running. Step A: Starting Up Double-click on the SSTReports .
Step D: Remove the Application and its Features SSTReports Uninstallation confirmation box is displayed asking the confirmation for removing the application and its features. Figure 2-3 SSTReports Uninstallation Confirmation Box Click on the Yes button to continue. Step E: Rebooting the System It is recommended to reboot the system for proper functioning. The SSTReports Uninstallation message box is displayed. Figure 2-4 SSTReports Uninstallation Message Box Click on the OK button to continue.
2-2 Uninstalling SST/OB Web Server Follow the steps given below to uninstall SST/OB Web Server. 1. Starting Up Click on the Start\Programs\HP SST\SST OB\Web Server\Uninstall Web Server menu option to start the uninstallation process. 2.
2-3 Uninstalling SST/OB Client Follow the steps given below to uninstall SST/OB Client. 1. Starting Up Click on the StartÆPrograms ÆHP SST ÆSST OB ÆClient ÆUninstall Client menu option to start the uninstallation process. 2. Close SST/OB Client Components Selecting the Uninstall Client option displays the SST Operations Bridge Client information box with the information that all the SST/OB Client components running on the system need to be closed. Click on the OK button to continue.
2-4 Uninstalling SST/OB Application Server Before beginning the uninstallation, you need to stop all the SST/OB services running on the machine. Follow the steps below to stop all the SST/OB services. 2-4-1 Stopping SST/OB Services 1. Use the Start ÆPrograms ÆHP SSTÆSST OB ÆServer ÆService Manager option to access the Service Manager. 2. Stop the selected SST/OB service(s) using the the listed service(s) right-click menu. You can use the button.
2-4-2 Uninstalling SST/OB Application Server Follow the steps given below to uninstall SST/OB Application Server. NOTE: Before beginning the uninstallation, ensure that all SST/OB components and services have been stopped. 1. Starting Up Click on the Start ÆPrograms ÆHP SST ÆSST OB ÆServer ÆUninstall Server menu option to start the uninstallation process. 2.
4. SST/OB Service Status Information The SST Operations Bridge Server Setup – Service Status Information screen is displayed. Figure 2-13 SST Operations Bridge Server Setup – Service Status Information Click on the Next button to proceed. 5. Rebooting the System It is recommended to reboot the system for proper functioning. The SST Operations Bridge Server Uninstallation information box is displayed.
Appendix A Installation Information: SST/OB Application Server 1. Destination Location The directory on the workstation where SST/OB Application Server is to be installed. 2. SQL Server Name The name of the SQL Server where the SST/OB database will be created or already exists. 3. SQL Server Port The port where the Microsoft SQL Server is listening. Default: 1433 4. SQL Authentication Type The SQL authentication type to be used in the SST/OB environment. 5.
Appendix B Installation Information: SST/OB Web Server and SST Reports 1. Destination Location The directory on the workstation where SST/OB Web Server is to be installed. 2. SQL Server Name The name of the SQL Server where the SST/OB database exists. 3. SQL Server Port The port where the Microsoft SQL Server is listening. Default: 1433 4. SQL Authentication Type The SQL authentication type to be used in the SST/OB environment. 5.
Appendix C Installation Information: SST/OB Client 1. Destination Location The directory on the workstation where SST/OB client is to be installed. 2. SQL Server Name – For SST/OB Database The name of the SQL Server with the SST/OB database already exists. 3. SST/OB Database SQL Server Port The port where the Microsoft SQL Server with the SST/OB database is listening. Default: 1433 4. SST/OB Database SQL Authentication Type The SQL authentication type to be used in the SST/OB environment. 5.
Document Feedback Form We would appreciate your comments on the HP SST Operations Bridge Installation Guide. After you have read the Guide and used the software, please take a few moments to complete this form and return it to appropriate HP product support service. 1. The organization of the Guide makes it easy to locate topics quickly. Strongly Disagree 1 2. Strongly Agree 2 3 4 The appearance of the pages makes it easy to locate information quickly. Strongly Disagree 1 3.
9. The level of writing in this book is: Too Basic Just Right Too Technical (Please be specific.) 10.