
SWAN 2 Concentrator Installation and Support Guide


Replacing a Communications Line Interface
Processor (CLIP)
SWAN 2 Concentrator Installation and Support Guide—429593-010
6-5
Unpack and Inspect the Replacement CLIP
Unpack and Inspect the Replacement CLIP
1. Disconnect the grounding clip of your ESD wriststrap from the SWAN 2
concentrator rack and connect it to an antistatic mat.
2. Place the shipping container containing the replacement CLIP on the antistatic
mat.
3. Open the shipping container and remove the CLIP.
4. Visually inspect the replacement CLIP for damage. Make sure that its edges are
sharp, uniform, and not bent. Use a flashlight, if necessary, to check for bent
edges. If the CLIP is damaged, do not use it. Instead, contact your HP service
provider.
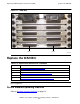
Install the Replacement CLIP
1. Disconnect the grounding clip of your ESD wriststrap from the antistatic mat and
connect it to an unpainted metal surface on the replacement CLIP.
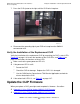
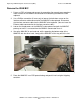
2. Grasp the CLIP by its ejector in one hand, support the bottom edge of the CLIP
with the other hand, carry the CLIP to the front of the SWAN 2 concentrator rack,
and set it down on an antistatic mat rightside up with its label readable.
3. Disconnect the grounding clip of your ESD wriststrap from the replacement CLIP
and connect it to an unpainted metal surface on the front of the SWAN 2
concentrator rack.
4. Unlatch the CLIP ejector and pull it to the left to unlock the CLIP.
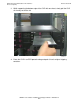
5. Using both hands, line up the CLIP with the guides inside the CLIP slot.
6. Carefully push the CLIP all the way into the CLIP slot.
Caution. When opening the shipping container, be careful not to cut into the ESD protective
bag.
Note. The CLIP weighs 1.4 pounds (0.64 kilograms)