
SWAN 2 Concentrator Installation and Support Guide


Replacing a Communications Line Interface
Processor (CLIP)
SWAN 2 Concentrator Installation and Support Guide—429593-010
6-6
Verify the Installation of the Replacement CLIP
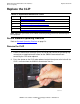
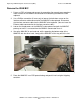
7. Press the CLIP ejector to the right until the CLIP locks into place.
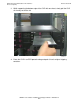
8. Disconnect the grounding clip of your ESD wriststrap from the SWAN 2
concentrator rack.
Verify the Installation of the Replacement CLIP
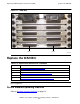
Verify the installation of the replacement CLIP by examining the CLIP’s status LEDs.
Figure 2-5 on page 2-33 shows the locations of the CLIP LEDs, and Table 2-4 on
page 2-31 describes the functions of these LEDs.
•
Make sure that the green power-on LED is lit.
•
If the power-on LED is not lit:
°
Reseat the CLIP.
°
Check the CLIP for damage. Replace the CLIP if it is damaged.
°
Use the OSM Service Connection or TSM Service Application to check for
alarms related to the CLIP.
•
If the amber fault LED is lit, see Table 2-5 on page 2-37.
Update the CLIP Firmware
When you replace a CLIP, you might need to update its firmware. See either:
•
Appendix A, Using OSM to Update SWAN 2 CLIP Firmware.
•
Appendix B, Using TSM to Update SWAN 2 CLIP Firmware
VST918.vsd