
SWAN 2 Concentrator Installation and Support Guide

Replacing a Chassis
SWAN 2 Concentrator Installation and Support Guide—429593-010
13-5
Replace the Chassis
Replace the Chassis
Review Standard Operating Practices
Refer to Standard Operating Practices on page 5-3.
Remove the Associated SWAN 2 Concentrator
1. Disconnect the communication cables from the SWAN 2 concentrator containing
the chassis to be replaced:
a. Use a slotted screwdriver (if necessary) to loosen the lock-down screws on the
interface converter cables. Disconnect each interface converter cable from the
WAN ports on the back of the associated SWAN 2 concentrator. (You can
leave your Ethernet cables connected to the associated interface converter
cables.)
b. Disconnect the Ethernet cables from the Ethernet ports on the back of the
associated SWAN 2 concentrator.
2. Remove the associated SWAN 2 concentrator from the rack by following the
procedure described in Remove the SWAN 2 Concentrator on page 3-3.
Remove the Components From the Associated SWAN 2
Concentrator
1. Remove both LAN logic boards following the procedure described in Remove the
LAN LB on page 8-2.
2. Remove both power supplies following the procedure described in Remove the
Power Supply on page 10-3.
3. Remove all CLIPs following the procedure described in Remove the CLIP on
page 6-3.
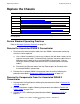
Table 13-2. Replacement Checklist for a Chassis
Step Description
1.
Review Standard Operating Practices.
2.
Remove the Associated SWAN 2 Concentrator.
3.
Remove the Components From the Associated SWAN 2 Concentrator.
4.
Unpack and Prepare the Replacement Chassis.
5.
Reinstall the Components in the Associated SWAN 2 Concentrator.
6.
Reinstall the Associated SWAN 2 Concentrator.
Note. Whenever you handle a chassis, follow standard operating practices to avoid damage to
the equipment.