
SWAN 2 Concentrator Installation and Support Guide

Replacing a Chassis
SWAN 2 Concentrator Installation and Support Guide—429593-010
13-7
Reinstall the Associated SWAN 2 Concentrator
Reinstall the Associated SWAN 2 Concentrator
1. Rack-mount the SWAN 2 concentrator containing the replacement chassis
following the procedure described in Rack-Mount the SWAN 2 Concentrator on
page 2-9.
2. Connect the Ethernet cables to the associated SWAN 2 concentrator following the
procedure described in Connect the Ethernet Cables on page 2-11 and referring to
the labels you put on the cables.
3. Connect the interface converter cables to the WAN ports on the associated
SWAN 2 concentrator following the procedure described in Connect the Interface
Converter Cables to the WAN Ports on page 2-29 and referring to the labels you
put on the cables.
4. Power-on the associated SWAN 2 concentrator following the procedure described
in Power On the SWAN 2 Concentrator and Run the Power-On Self-Test (POST)
on page 2-31.
Resume Operations on the Chassis
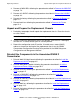
1. Start the SWAN 2 concentrator containing the replacement chassis. Example 13-4
shows how to start the SWAN 2 concentrator named $ZZWAN.#S01 using the SCF
START ADAPTER command. The SUB ALL option starts the concentrator and its
subordinate objects.
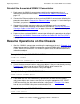
2. Create the data communications subsystem objects if they are not already running.
Example 13-5 shows how to start a DEVICE object, which creates the
corresponding data communications subsystem object.
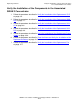
3. If the WAN lines are not automatically started when the data communications
subsystem objects are started, start the lines using the appropriate SCF START
LINE command for the data communications subsystems. Example 13-6 shows
how to start an X25AM subsystem communication line.
Example 13-4. Sample SCF START ADAPTER Command
ALLOW ALL ERRORS
START ADAPTER $ZZWAN.#S01, SUB ALL
Example 13-5. Sample SCF START DEVICE Command
START DEVICE $ZZWAN.#X25l1
Example 13-6. Sample SCF START LINE Command
START LINE $X25l1