
SWAN 2 Concentrator Installation and Support Guide


Replacing a SWAN 2 Concentrator
SWAN 2 Concentrator Installation and Support Guide—429593-010
3-2
Determine the Physical Location of the SWAN 2
Concentrator
Determine the Physical Location of the SWAN 2 Concentrator
To locate the SWAN 2 concentrator to be replaced, use the OSM Service Connection
or TSM Service Application (G06.21 and earlier RVUs only):
1. In the tree pane of the Management window, select the SWAN 2 concentrator to be
replaced.
2. Click the Attributes tab of the details pane to determine the Track ID of that
SWAN 2 concentrator.
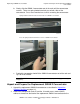
3. Physically locate the SWAN 2 concentrator that has this Track ID on the back
panel of its chassis (see Figure 1-4 on page 1-5).
Stop the Communication Lines Using the SWAN 2 Concentrator
To stop the communication lines that are using the SWAN 2 concentrator to be
replaced, shut down the WAN lines by using the appropriate data communications
subsystem ABORT LINE command.
Stop and Reconfigure the SWAN 2 Concentrator
1. Use the SCF STOP ADAPTER command with the SUB ALL option to stop the
concentrator and its subordinate objects.
2. Reconfigure the WAN subsystem software with the configuration track-ID of the
replacement SWAN 2 concentrator using the SCF ALTER ADAPTER command.
3. Power off the SWAN 2 concentrator to be replaced by unplugging both AC power
cords from the AC power receptacles on the concentrator.
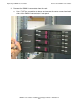
Label the Communication Cables Connected to the SWAN 2
Concentrator
1. Label each interface converter cable connected to the SWAN 2 concentrator you
are replacing to indicate which WAN BIC and WAN port it is connected to. Each
WAN BIC is labeled with an identifier (see Figure 7-1 on page 7-3).
Example 3-1. Sample X25AM Subsystem SCF ABORT LINE Command
ABORT LINE $X25L1
Example 3-2. Sample SCF STOP ADAPTER Command
STOP ADAPTER $ZZWAN.#S01, SUB ALL
Example 3-3. Sample SCF ALTER ADAPTER Command to Alter Track-ID
ALTER ADAPTER $ZZWAN.#S01, TRACKID "new_track_id"