
SWAN 2 Concentrator Installation and Support Guide


Replacing a SWAN 2 Concentrator
SWAN 2 Concentrator Installation and Support Guide—429593-010
3-3
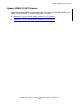
Replace the SWAN 2 Concentrator
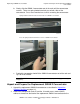
2. Label each Ethernet cable connected to the SWAN 2 concentrator you are
replacing to indicate which Ethernet port it is connected to.
You will use this information when connecting these cables to the replacement
SWAN 2 concentrator.
Replace the SWAN 2 Concentrator
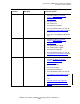
Review Standard Operating Practices
Refer to Standard Operating Practices on page 5-3.
Remove the SWAN 2 Concentrator
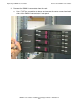
1. Disconnect the communication cables from the SWAN 2 concentrator:
a. Use wire cutters to cut any cable ties that are securing communication cables.
b. Slide the cables out of their D-rings or wireform brackets.
c. Use a slotted screwdriver (if necessary) to loosen the lock-down screws on the
interface converter cables. Disconnect each interface converter cable from the
WAN ports on the back of the SWAN 2 concentrator to be replaced. (You can
leave your Ethernet cables connected to the interface converter cables.)
d. Disconnect the Ethernet cables from the Ethernet ports on the back of the
SWAN 2 concentrator to be replaced.
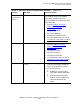
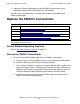
Table 3-2. Replacement Checklist for SWAN 2 Concentrator
Step Description
1.
Review Standard Operating Practices.
2.
Remove the SWAN 2 Concentrator.
3.
Unpack and Prepare the Replacement SWAN 2 Concentrator.
4.
Install the Replacement SWAN 2 Concentrator.
Note. Whenever you handle a SWAN 2 concentrator, follow standard operating practices to
avoid damage to the equipment.