
SWAN Concentrator Installation and Support Guide

Installing a SWAN Concentrator
SWAN Concentrator Installation and Support Guide—429391-006
2-30
Replacing a SWAN Concentrator
8. Locate the power cord of the old SWAN concentrator. Check that the power switch
is set to the 0 (OFF) position. Power off the old SWAN concentrator.
9. Label each interface converter cable connected to the front of the old SWAN
concentrator to show which communications line interface processor (CLIP) and
WAN port it is connected to. You will need this information when connecting these
cables to the replacement SWAN concentrator.
10. Use a flat-head screwdriver (if necessary) to loosen the lock-down screws on the
interface-converter cables. Disconnect each interface-converter cable from the
WAN ports on the front of the old SWAN concentrator. (You can leave your cables
connected to the interface-converter cables.)
11. Label each Ethernet cable to show which Ethernet port it is connected to. You will
need this information when connecting these cables to the replacement SWAN
concentrator.
12. Disconnect the Ethernet cables from the Ethernet ports on the front of the old
SWAN concentrator, making note of the port that each cable is plugged into.
13. Unplug the power cord from its AC outlet. You can leave the power cord attached
to the old SWAN concentrator. A replacement power cord is provided with the
replacement SWAN concentrator.
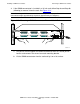
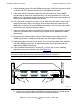
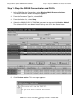
14. If the old SWAN concentrator is installed in a 19-inch rack, use the following
procedure to remove it from the rack. See Figure 2-15.
a. One person should support the SWAN concentrator while the second person
loosens and removes the screw from each mounting bracket.
Note. Removing a SWAN concentrator from a rack requires two people. The SWAN
concentrator weighs approximately 12 pounds (approximately 5.5 kilograms).
Figure 2-15. Removing a SWAN Concentrator From a 19-Inch Rack
POWER
CLIP 1 CLIP 2 CLIP 3
FAULT FAULT
FAULT
10BASE-T
PATH
LNK
TX
COL
RX
LNK
TX
COL
RX
A B
VST873.vsd