
Virtual TapeServer 6.03.41 Operations and Administration Guide


Modifying Virtual Tape Drives | 17
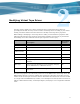
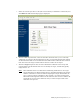
j. Specify the host, or initiator, type by choosing an option from the host_type drop-
down list. This property is for reference only; it is not presented to the host. It also
specifies the icon selected for the virtual tape on the web interface pages.
k. In the serial_number field, specify the serial number of your virtual tape. Or, specify
a 10 character string that is meaningful to you. This field is optional but the string is
presented to the host, and you may find it useful to refer to this string.
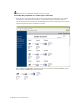
l. Click Edit Virtual Tape to save your settings.
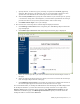
3. Re-associate the virtual tape drive with the logical and physical drives:
a. Click Manage Connections in the navigation pane. The Manage Tape Connections
page is displayed.
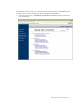
b. Click Add a tape connection. The Add A Tape Connection page is displayed:
c. Select the virtual tape drive you want to reconnect from the Virtual Tapes section of
the page.
d. Select the logical and physical drives to which you want to reconnect the virtual tape
from the Logical Tapes section of the page.
e. Click Add Tape Connection. If successful, the connection is added at the bottom of
the virtual-logical-physical associations on the System Overview page.
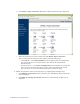
It is recommended that you backup the VTS database after modifying the VTS configuration.
To backup the database, you must have the Factory Setup Activities access right. Click
Factory Setup on the navigation pane, and then click Administrator Utilities. On the
Administrator Utilities page, click Backup The Database. Specify a location where the
backup file will be saved and click Proceed.