
Virtual TapeServer 6.03.42 Operations and Administration Guide

56 | Managing Pools and Virtual Tapes
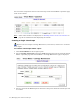
4. Enter a name for the NEW POOL field.
Note The pool name must be unique across all vaults on the VTS server.
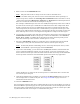
5. To set a size limit on the pool, such as because of size limitations when exporting to a
physical tape drive, deselect the Cartridge Size unlimited checkbox and enter a size (1
- 1023) in the field. Select Megabytes, Gigabytes, or Terabytes from the drop-down list.
This sets a maximum size for the virtual tapes in the pool.
For example, a DLT7000 tape drive can store 35GB (uncompressed) of data. You could set
the limit on the virtual tape to 35GB because VTS tracks sizes after compression. Even
though a virtual tape size may be 35GB, much more data is written from the host but,
after compression, the amount of data is 35GB. When you export the virtual tape to the
physical tape, VTS reads the virtual tape, uncompresses the data, and sends it to the tape
drive. The tape drive uses its own compression algorithm to compress the data again.
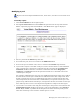
6. If you want to set a limit to how long the virtual tapes in the pool are stored, deselect the
unlimited Retention checkbox and specify a value in the field. Then, select minutes,
hours, days, weeks, or years from the drop-down list. This retention period governs
when the virtual tape can be erased to reclaim space in a vault.
7. Select the Autoloading checkbox to enable the pool to automatically load and unload
virtual tapes as they are used, from the first to the last virtual tape in the pool.
Note To manually disable autoloading, select a virtual tape drive (host device) on the
Virtual Media - Operation page and click Unmount.
8. If you select Autoloading, you can then select the Recycle checkbox, which enables the
pool to autoload indefinitely without user intervention. A pool can automatically cycle
back to the first virtual tape in the autoloader when the last virtual tape is unloaded. This
feature provides continuous and unattended operation for almost any application.
If this checkbox is not selected, the virtual tape drive is unmounted after it reaches the
last virtual tape in the pool.
9. If the SecureVTS feature is enabled, you can select the Encrypted checkbox to encrypt
all cartridges that are added to the pool. See
Using SecureVTS on page 75 for more
information about this feature.
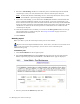
10. Click the CREATE button.
You can click the pool drop-down list to confirm that the pool was created. When you return to
the Virtual Media - Operation page, the new pool is listed and a red dot is displayed to the left
of its name. This symbol indicates that the pool is present but contains no virtual tapes. (The
+ symbol indicates that virtual tapes are contained in this pool.)