
Virtual TapeServer 6.03.42 Operations and Administration Guide

Managing Pools and Virtual Tapes | 57
Modifying a pool
Requires the Virtual Tape Pool Maintenance, Vault Access, and Access to all Vaults access
rights
To modify a pool
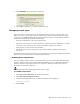
1. Click Virtual Media on the navigation pane.
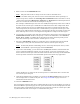
2. Select pool maintenance from the window drop-down list at the top of the Virtual
Media - Operation page. The Virtual Media - Pool Maintenance page is displayed.
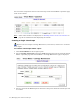
3. Select a pool from the POOL drop-down list.
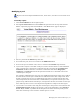
4. To rename the pool, enter a new name in the NEW POOL field.
5. To move the pool to another vault, select a vault from the VAULT drop-down list.
6. If you want to impose a size limit on the pool, such as because there are size limitations
when a virtual tape is exported to a physical tape drive, deselect the Cartridge Size
unlimited checkbox and enter a size from 1-1023 in the field. Select Megabytes,
Gigabytes, or Terabytes from the drop-down list. This sets a maximum size for the
virtual tapes in the pool.
For example, a DLT7000 tape drive can store 35GB (uncompressed) of data. You could set
the limit on the virtual tape to 35GB because VTS tracks sizes after compression. Even
though a virtual tape size may be 35GB, much more data is written from the host but,
after compression, the amount of data is 35GB. When you export the virtual tape to the
physical tape, VTS reads the virtual tape, uncompresses the data, and sends it to the tape
drive. The tape drive uses its own compression algorithm to compress the data again.
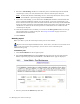
7. If you want to set a limit to how long the virtual tapes in the pool are stored, deselect the
unlimited Retention checkbox and specify a value in the field. Then, select minutes,
hours, days, weeks, or years from the drop-down list. This retention period governs
when the virtual tape can be erased to reclaim space in a vault.