
Virtual TapeServer 6.04.01 Operations and Administration Guide


20 | Modifying Virtual Tape Drives
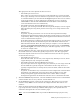
j. Specify the host, or initiator, type by choosing an option from the host_type drop-
down list. This property is for reference only; it is not presented to the host. This
property also specifies the icon selected for the virtual tape on the interface pages.
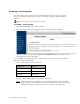
k. In the serial_number field, specify the serial number of your virtual tape. You can
specify up to 10 alphanumeric characters. This string is presented to the host and
should be unique (across all VTS servers and VTDs in the environment).
This field is optional unless the host server is a NonStop BladeSystem. If you do not
enter a serial number, the BTLI will be presented to the host as the serial number but
not shown in the web interface. The default BTLI serial number is unique per VTS
server but other VTS servers may create the same BTLI serial number. In an
environment with more than one VTS server connected to a NonStop BladeSystem,
specify serial numbers that are unique across the environment to avoid conflicts.
l. Click Edit Virtual Tape to save your settings.
3. Re-associate the virtual tape drive with the logical and physical drives:
a. Click Manage Connections in the navigation pane. The Manage Tape Connections
page is displayed.
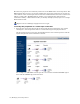
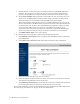
b. Click Add a tape connection. The Add A Tape Connection page is displayed:
c. Select the virtual tape drive you want to reconnect.
d. Select the logical and physical drives to which you want to reconnect the virtual tape
drive from the Logical Tapes section of the page.
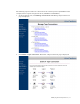
e. Click Add Tape Connection. If successful, the connection is added at the bottom of
the virtual-logical-physical associations on the System Overview page.
It is recommended that you back up the VTS database after modifying the VTS configuration.
See
Backing Up the VTS Server on page 13 for more information.