
Virtual TapeServer 6.04.02 for NonStop Servers Quick Setup Guide


Virtual TapeServer Quick Setup Guide | 9
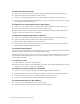
To connect to power
A. Connect both power cords to the VTS server.
B. Plug each power cord into a grounded electrical outlet. It is recommended that the cords be
routed to separate power sources for redundancy.
To connect to monitor, keyboard, and mouse
A. Connect one end of a VGA cable into the VGA port on the VTS server.
B. Connect the other end of the cable into the monitor or computer with terminal emulation.
C. If using a keyboard, connect it to a PS/2 or USB port on the VTS server.
D. If using a mouse, connect it to a PS/2 or USB port on the VTS server.
To connect the iLO port to the network
A. Connect one end of an Ethernet cable to the iLO port.
B. Connect the other end of the cable to the LAN or WAN switch.
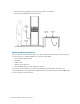
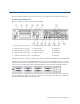
Connect the VT5900-J
Here is an illustration of the back of the VT5900-J:
As a best practice, use all 4Gb ports first and connect the external disk array or tape device to a
4Gb port. Then, if necessary, connect external storage to the 2Gb ports, which may provide half
the performance as the 4Gb ports.
1. 2Gb FC port (slot 4, port A)
2. 2Gb FC port (slot 5, port A)
3. 2Gb FC port (slot 5, port B)
4. 2Gb FC port (slot 4, port B)
5. 4Gb FC port (slot 2, port A)
6. 4Gb FC port (slot 2, port B)
7. Power plugs
8. Ethernet port 2
9. Ethernet port 1
10. PS/2 port
11. PS/2 port
12. VGA port
13. USB ports
14. Serial port
15. iLO port