
Virtual TapeServer 6.04.03 for NonStop Servers Quick Setup Guide


18 | Virtual TapeServer Quick Setup Guide
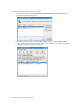
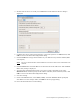
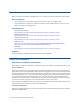
F. Click Manage system limits. The following page is displayed:
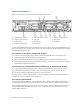
G. Configure the port used to attach VTS to the host server. Select the Virtual checkbox for the
bus (port) that is attached to the host server. Be aware of the following:
• Grey boxes indicate ports on the SCSI card(s)
• Yellow boxes indicate ports on the Fibre Channel card(s); hold your cursor over the
checkbox to view the speed of the port
• It is recommended that you set the highest numbered ports to Virtual.
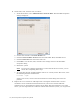
Click OK to acknowledge that the bus may migrate to a new bus number following a reboot,
and the click OK to confirm that you want to set the bus to virtual mode.
H. Configure the port(s) used to attach VTS to the external storage device(s). For each port that
was used, select the Physical checkbox.
I. Click Set Limits. The VTS server automatically reboots.
J. Label the ports on the back of the VTS server. Locate the bus number labels that were
shipped with VTS. For each port that is used, apply a label. The number on the label should
correspond to the bus number on the Manage system limits page.
If problems arise:
• Be sure that you are using a local web browser instead of remote web browser.
• Enter localhost in the address field of the browser instead of the hostname or IP address.
• Make sure there are no bus conflicts with a physical drive on a virtual port or with the
virtual port.
8 Configure storage space and path failover
If deploying external storage for use with VTS, you must define a storage space on the disk array
for use with the Linux operating system. Then, present a logical unit number (LUN) that refers
to this storage space. Note that each LUN should not represent more than 4TB of space.