Virtual TapeServer for NonStop Servers Installation Guide HP Part Number: 628534-001 Published: July 2010 Edition: All J06 release version updates (RVUs), all H06 RVUs, and all G06 RVUs
© Copyright 2010 Hewlett-Packard Development Company, L.P. Legal Notice Confidential computer software. Valid license from HP required for possession, use or copying. Consistent with FAR 12.211 and 12.212, Commercial Computer Software, Computer Software Documentation, and Technical Data for Commercial Items are licensed to the U.S. Government under vendor’s standard commercial license. The information contained herein is subject to change without notice.
Contents Preface . . . . . . . . . . . . . . . . . . . . . . . . . . . . . . . . . . . . . . . . . . . . . . . . . . . . . . . . . . . . . . . . . . . . . . .v About this guide . . . . . . . . . . . . . . . . . . . . . . . . . . . . . . . . . . . . . . . . . . . . . . . . . . . . . . . . . . . . . . v Supported release version updates . . . . . . . . . . . . . . . . . . . . . . . . . . . . . . . . . . . . . . . . . . . . . . . v Audience . . . . . . . . . . . . . . . . . . . . . . . . . . . . . . . . . . .
iv | Contents
Preface Welcome to the Virtual TapeServer Installation Guide. This guide provides configuration information for Virtual TapeServer (VTS). VTS enables host systems to read from and write to a local or SAN-attached file system. The virtual tape drive emulates the type of tape drive specified during the initial installation and setup process. About this guide The Virtual TapeServer Installation Guide is designed to help you configure VTS.
Related documentation In addition to this installation guide, the following documentation is provided: • Virtual TapeServer Quick Start Guide, which provides instructions for installing the hardware and configuring VTS on the network. • Virtual TapeServer Operations and Administration Guide, which describes how to use the VTS web interface to manage VTS.
You may also consider gathering the output of the getVTS_dbginfo utility, which is provided on the VTS server, or you can generate a troubleshooting package from the web interface. The utility and troubleshooting package collect log files and system information. Refer to the Virtual TapeServer Operations and Administration Guide for more information about these.
viii | Preface
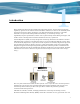
Introduction Tape remains the most practical solution for removable storage, and it is often required by regulatory agencies to be archived and stored offsite. However, as the cost of commodity disk storage has decreased, many enterprises view disk-based backup solutions as a feasible alternative to tape-based backup.
deploy VTS to simplify and streamline traditional tape operations, reduce costs for storage hardware and tape media, automate backup and restore operations, and increase flexibility in managing backed-up data. The virtual environment The basic building blocks of VTS are vaults, pools, virtual tape drives, and virtual tapes. VTS can support multiple virtual tape drives that respond to tape commands just as a physical tape drive would.
Overview of features The heart of VTS is a middleware tape emulation engine that enables VTS to emulate tape storage to host servers and provides backup storage for the data on industry standard, lowcost disk arrays. Data stored in VTS can later be copied to real tape media for archival storage or disaster recovery if long-term backup copies are required.
Accessing the VTS web interface VTS is managed through a standard web browser interface. To access the web interface, launch a supported web browser that is on the same internal network as VTS, enter the following URL: https://hostname/ where hostname is the hostname of the VTS server. If VTS is configured to use a self-signed certificate to secure communication between your browser and the VTS web application server, the certificate may cause the browser to display a warning page and certificate errors.
Overview of Configuration Tasks After completing the procedures provided in the Virtual TapeServer Quick Start Guide, you can continue the initial configuration of the Virtual TapeServer (VTS) server. This guide provides those configuration procedures. Note If you are upgrading to 6.04.04, refer to the Virtual TapeServer Release Notes for upgrade instructions and considerations before completing the server configuration outlined here.
6 | Overview of Configuration Tasks
Reconfiguring Vaults By default, vault storage is configured on the Virtual TapeServer (VTS) server. Prior to using this storage, you may want to review and change the configuration. For example, you may want to define additional vaults, which provide a convenient way to separate data for different applications or users. You may want to reconfigure vault storage before creating virtual tape drives (VTDs) or using VTS, though you can use VTS without reconfiguring vaults.
Here is an example of the output. The bolded lines indicate partitions that are eligible for configuration: Filesystem /dev/cciss/c0d0p2 /dev/cciss/c0d0p4 /dev/cciss/c0d0p1 tmpfs /dev/cciss/c0d1p1 Size 19G 112G 99M 502M 3.3T Used 6.7G 338M 24M 0 535G Avail 12G 106G 70M 502M 2.6T Use% Mounted on 38% / 1% /VAULT00 26% /boot 0% /dev/shm 17% /VAULT01 3. Use parted to display the current partition layout for all disks.
c. Delete any partitions that you want to reconfigure by entering the following command: d d. Select the partition by entering the following command: 1 e. Add a new partition by entering the following command: n f. Choose the primary partition by entering the following command: p g. Select the first partition by entering the following command: 1 h. Accept the cylinder defaults by pressing ENTER twice. i.
f. Review the layout by entering the following command: print Here is an example of the output: Model: Compaq Smart Array (cpqarray) Disk /dev/cciss/c0d3: 2500GB Sector size (logical/physical): 512B/512B Partition Table: gpt Number 1 2 Start 17.4kB 1250GB End 1250GB 2500GB Size 1250GB 1250GB File system ext3 primary Name primary Flags g. Quit parted. quit 4. Create file systems on the newly created partitions.
Configuring Ports and Licensing To complete configuration, you must configure ports and licensing. This chapter describes these procedures. Configuring ports After cabling the host server(s) and external devices to the VTS server, you must configure the ports to enable VTS to communicate properly with each device (target or initiator). Or, if you attach a physical tape drive or storage device to the server after initial configuration, you must define the port as physical.
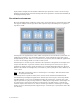
3. Click Manage Connections on the navigation pane. Ports are configured in the MANAGE PORT CONFIGURATION section of the page. (An image of your server will be displayed. The example below is an image of the DL380 G6.) 4. Configure each port as described in the help. To view the help, click the Help button at the top of the page. Configuring licensing Before you can use Virtual TapeServer (VTS), you must enable licensing.
Requires Administration group membership To enter a license key 1. Log in to the VTS web interface using an account that is a member of the Administration group. Click the Log In button at the top of the page and enter a username and password. 2. Click Supervisor Functions on the navigation pane. 3. Click Manage System Licenses. The following page is displayed: 4. Enter license keys as described in the help. To view the help, click the Help button at the top of the page. 5. Restart the TapeServer service.
14 | Configuring Ports and Licensing
Creating Virtual Tape Drives After Virtual TapeServer (VTS) is deployed, you must create virtual tape drives (VTDs). Up to 32 VTDs are supported per VTS server, Your licensing determines how many VTDs you can create. If you must modify a VTD after it is created, refer to the online help. Creating a standalone VTD The following table describes the properties that you must set when defining a standalone VTD.
The following procedure describes how to create a VTD using the Manage Connections page. The full procedure is documented in the online help, which is accessed by clicking the Help button on the Manage Connections page of the VTS web interface. Note At least one port must be set to Virtual (target) mode on the Manage Connections page before you can create a VTD. Ports should have been configured as described in the help. Requires the View/Manage Configuration access right To add a VTD 1.
4. Click Add Virtual Tape Drive in the VIRTUAL TAPE DRIVES section of the Manage Connections page. The following is displayed: 5. Configure the VTD as described in the help. To view the help, click the Help button at the top of the page. You can now create virtual tapes for use with VTDs. And, it is recommended that you back up the VTS database after modifying the VTS configuration. Refer to the Virtual TapeServer Operations and Administration Guide for these procedures.
6. If steps 4 and 5 are successful, issue the SCF command to add a tape. Here is an example: SCF ADD TAPE $VFHP00, SENDTO STORAGE, CLIM S1002531, LUN 1, PRIMARYCPU 2,BACKUPCPU 2. 7. Start the virtual tape drive. If a 224 error occurs, delete the drive and make sure steps 4 and 5 are successful. Validating access to VTDs from the NonStop server To validate that the NonStop server can back up to configured VTDs in VTS, you must configure the NonStop server to add the VTD.
To start the virtual tape drive, enter the following command on the NonStop server: SCF START TAPE $VTD This command should return messages similar to the following if successful: SCF - T9082G02 - (06JAN06) (31OCT05) - 01/19/2007 08:42:11 System \DEV3 (C) 1986 Tandem (C) 2006 Hewlett Packard Development Company, L.P.
20 | Creating Virtual Tape Drives
Configuring Access Control If you have system administrator privileges, you can configure access control to grant or limit access to specific Virtual TapeServer (VTS) functions. Each login ID belongs to a group and each group has a unique set of privileges. Note VTS provides a user that has administrator privileges. You can log in as admin if no other administrative user is created on the system. The default password for this user is virtual.
3. Under Defaults and Undo, click the Restore CLOSED Defaults button, which restores all default users, groups, and rights. 4. Click OK on the pop-up dialog box to confirm that you want to restore closed defaults. Below are closed system defaults: • • Users — The following users are defined.
Rights Administration Group Upload VPD X Configuration Backup X Configuration Restore Supervisor Group X X View log files X View/Manage Configuration X Virtual Tape Operations Operations Group X X X X Scan and Cleanup Control Panel X X Virtual Tape Cartridge Maintenance X X Delete Cartridges X X Virtual Tape Import and Export X X Virtual Tape Instant DR X X Virtual Tape Mounts and Locks X X Virtual Tape Pool Maintenance X X Erase Cartridges X X HSM Migration X X
3. Add a user as described in Creating a user on page 25. 4. Add a group: a. Click + to expand Users and Groups. b. Click ADD next to Groups. c. In the add group field, type a name for the group. d. Click APPLY. 5. Add the user to the group: a. Deselect the new user in the Users drop-down list and select it again to enable the CHANGE GROUP button. b. Click CHANGE GROUP. c. Select the group from the in Group drop-down list. d. Click APPLY. 6. Assign rights to the group: a. Expand + to expand Rights. b.
Managing users You can add users to VTS or modify settings of an existing user. The following sections describe how to create, modify, and delete users. Note In the following procedures, if the Users and Groups and Rights sections of the Access Control page are not available, you must enable a closed system. These sections are not displayed if the system is configured as open access. Creating a user Requires the System Access Controls access right To create a user 1.
3. Click + to expand Users and Groups. 4. Click ADD next to Users. The name and password fields are displayed. 5. Type a username in the name field. Usernames cannot contain spaces and cannot duplicate existing usernames, group names, or reserved names. Also, they must be alphanumeric, though they can include an _ (underscore) character. 6. Type a password in the password field.
7. Click APPLY. The user is added and additional buttons are displayed. 8. To assign the user to a group, click CHANGE GROUP. The Group drop-down list is displayed. Note The user cannot perform functions until you assign the user to a group. 9. Select a group from the drop-down list and click APPLY.
Changing any user’s password It is highly recommended that you change the passwords of the default users. Requires the System Access Controls access right to change any user’s password To change a user’s password 1. Click Access Control on the navigation pane. 2. If prompted, log in. After logging in, the Access Control page is displayed. 3. Click + to expand Users and Groups.
4. Select the user from the Users drop-down list. 5. Click SET PASSWORD. The Password field is displayed. 6. Type a new password in the field. 7. Click APPLY. Changing your password Requires the User Access Controls access right to change your password only To change your own password 1. Click Access Control on the navigation pane. 2. If prompted, log in. After logging in, the User Access Control page is displayed. 3. Type your current password in the Old password field. 4.
Assigning a user to a group Requires the System Access Controls access right To assign a user to a group 1. Click Access Control on the navigation pane. 2. If prompted, log in. After logging in, the Access Control page is displayed. 3. Click + to expand Users and Groups.
4. Select the user from the Users drop-down list. The SET PASSWORD and CHANGE GROUP buttons are displayed. 5. To assign the user to a group, click CHANGE GROUP. 6. Select a group from the drop-down list and click APPLY. Deleting a user Requires the System Access Controls access right To delete a user 1. Click Access Control on the navigation pane. 2. If prompted, log in. After logging in, the Access Control page is displayed.
3. Click + to expand Users and Groups. 4. Select the user from the Users drop-down list. 5. Click REMOVE. 6. When prompted, click OK to confirm that you want to remove the selected user.
Configuring groups Groups define the access rights that are assigned to users. Three groups are provided: Administration, Operations, and Supervisor. For a list of the default rights assigned to these groups, see page 22. You can modify the access rights that are assigned to these groups. You can also save your changes as a set of custom defaults, which can be restored later if necessary.
3. Click + to expand Rights. 4. To modify access rights assigned to the Administration group, select the checkbox next to each access right in the Administration column. Note The rights are organized in categories. If you grant access to a category, all rights in the subcategories are granted by default, though you can remove individual rights in the subcategories.
Right Description Block and Unblock TapeServer Displays the Block & Unblock TapeServer link on Supervisory Functions page, which enables the user to block and unblock VTS functions Database Download Enables the user to create a system restore image from the Supervisory Functions page Database Upload Enables the user to restore a system restore image from the Supervisory Functions page Edit Configuration File Enables the user to edit the VTS configuration file from the Supervisory Functions page Ha
Right Description Virtual Tape Import and Export Grants access to the Virtual Media - Import/ Export page Virtual Tape Instant DR Grants access to the Virtual Media - Instant DR page Virtual Tape Mounts and Locks Grants access to the Virtual Media - Mounts and Locks page Virtual Tape Pool Maintenance Grants access to the Virtual Media - Pool Maintenance page Erase Cartridges Enables the user to erase virtual tapes from the Virtual Media - Operation and Virtual Media Cartridge Maintenance pages H
Saving and restoring custom defaults After configuring users and group rights, you can save all settings as a custom configuration. Later, you can restore these settings by simply clicking the Restore CUSTOM Defaults button in the Defaults and Undo section of the page. This button becomes available after you save a custom configuration. These procedures require the System Access Controls access right To save custom default settings 1. Click the Save as CUSTOM button above the access rights table. 2.
To restore the custom default settings Click the Restore CUSTOM Defaults button to restore the custom configuration and discard changes made since the custom defaults were last saved.
Configuring EMS Communication To automate the process of mounting and dismounting virtual tapes, you must configure the Event Management System (EMS) on the Virtual TapeServer (VTS). The EMS service for NonStop servers starts the EMS distributor on the NonStop server by issuing a Tandem Advanced Command Language (TACL) command. The distributor notifies the VTS EMS service when an EMS message is posted on the NonStop server.
c. Enable EMS and configure the settings, as described in the help. To view the help, click the Help button at the top of the page. 5. Set the username and password for each EMS host: a. Click Supervisor Functions on the navigation pane. b. Click Manage Passwords. The following page is displayed: c. Configure a password for each EMS host defined in the configuration file. Click Help for complete instructions. 6.
d. Enter yes to accept the fingerprint. If a mismatch occurs after accepting the fingerprint, you can edit the /home/bill/.ssh/ known_hosts file to remove lines for host server whose key has changed. Then, after the obsolete key has been removed, repeat this step to accept the new key. 7. Click RESTART on the Virtual Media - Mounts and Locks page to restart the EMS service. Or, click Start EMS Service on the Supervisory Functions page.
42 | Configuring EMS Communication
Credentials This appendix describes the operation system and web interface accounts that are provided with Virtual TapeServer (VTS). Operating system accounts Here is a list of the user accounts for the VTS operating system (Linux). • root • bill • vtsa The first time you log in to the VTS operating system using one of these usernames, you are prompted to change the password.
See Configuring Access Control on page 21 to modify the VTS user accounts.
Index A G access control overview 21 saving and restoring custom defaults 37 access rights, See rights assigning groups to a user 30 rights to a group 33 audience v AutoCopy, licensing 12 automating mounts 39 groups assigning rights 33 default rights 22 C certificate, warning message 4 CLIM, configuring VTDs 17 closed (access) system 21 compression, licensing 12 configuring access control 21 EMS 39 EMS user accounts 40 groups 33 licensing 11 passwords any user’s 28 yours 29 users 25 creating users 25 vi
S SecureVTS, licensing 12 Support vi T typographical conventions v U users assigning groups 30 creating 25 default accounts 22 deleting 31 EMS 40 V validating NonStop-to-VTS server backups 18 vaults, definition 2 virtual cartridges, See virtual tapes virtual tape drives configuring the CLIM 17 creating 15 definition 2 virtual tapes, definition 2 VTD, licensing 12 W web interface, overview 4 46 | Index