
Virtual TapeServer 6.04.04 for NonStop Servers Installation Guide


10 | Reconfiguring Vaults
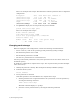
f. Review the layout by entering the following command:
print
Here is an example of the output:
Model: Compaq Smart Array (cpqarray)
Disk /dev/cciss/c0d3: 2500GB
Sector size (logical/physical): 512B/512B
Partition Table: gpt
Number Start End Size File system Name Flags
1 17.4kB 1250GB 1250GB ext3 primary
2 1250GB 2500GB 1250GB primary
g. Quit parted.
quit
4. Create file systems on the newly created partitions. Format the disk partition by entering
the following command:
mke2fs -j -L /VAULT01 /dev/cciss/c0d3p1
When specifying a vault name, use the following format: VAULTnn, where nn indicates a
number.
Repeat this command, incrementing nn for each new vault.
5. Update the file-system table to reflect the new disks. Using a text editor, add the
following lines to the /etc/fstab file for each vault created above:
LABEL=/VAULT01 /VAULT01 ext3 defaults 1 2
Repeat this command for each vault.
6. Create the mount directories by using the mkdir command for each of the vaults that
were created above. Here is an example of the command to create the mount directory for
VAULT01:
mkdir /VAULT01
Repeat this command for each vault.
7. Mount the new vault and set permissions. Here are example commands:
mount /VAULT01
chown bill.root /VAULT01
chmod 750 /VAULT01
Repeat these commands for each vault.
8. Verify the new configuration by entering the following command:
df -h